

Brighten up your holiday baking with Stained Glass Sugar Cookies that sparkle like little edible jewels. These buttery cookies cradle vibrant, melted candy centers that catch the light and bring smiles to every gathering. Whether you’re looking for a festive project to share with family or a unique gift idea, this recipe delivers crisp edges, tender crumbs, and glossy swirls of color. Grab your rolling pin and some hard candies—let’s make magic!
Key Ingredients
Before you get started, gather the essentials that give these cookies their buttery base and jewel-like windows.
- 1 cup unsalted butter, softened: Adds rich flavor and a tender, melt-in-your-mouth texture.
- 1½ cups granulated sugar: Sweetens the dough and helps achieve a light, fluffy crumb.
- 1 large egg: Binds the ingredients and contributes to a delicate structure.
- 1 teaspoon vanilla extract: Infuses warm, aromatic notes into every bite.
- 3 cups all-purpose flour: Forms the sturdy foundation for cutting and shaping.
- 1 teaspoon baking powder: Provides just enough lift to keep cookies tender.
- ¼ teaspoon salt: Balances sweetness and enhances overall flavor.
- 1 cup crushed hard candies (such as Jolly Ranchers or Lifesavers) in assorted colors: Creates vibrant, translucent centers that mimic stained glass.
- Optional: colored sugar for decoration: Adds extra sparkle and festive flair on top.
How To Make Stained Glass Sugar Cookies
Ready to roll up your sleeves and transform a simple dough into shimmering holiday treats? In this section, we'll walk through each stage of the process—from creaming butter and sugar to filling your cut-out shapes with crushed candy—so you end up with picture-perfect cookies every time. Follow these steps carefully, and feel free to experiment with cutters and candy colors as you go!
1. In a large mixing bowl, cream together the softened butter and granulated sugar using an electric mixer on medium speed for about 2–3 minutes, until the mixture is light and fluffy.
2. Beat in the egg and vanilla extract on low speed until fully incorporated, scraping down the sides of the bowl as needed.
3. In a separate bowl, whisk together the all-purpose flour, baking powder, and salt to distribute the leavening and seasoning evenly.
4. Gradually add the dry ingredients to the wet mixture, mixing on low until just combined—avoid overmixing to keep the cookies tender.
5. Divide the dough into two equal portions, flatten each into a disk, wrap securely in plastic wrap, and refrigerate for at least 1 hour or until firm.
6. Preheat your oven to 350°F (175°C) and line baking sheets with parchment paper for easy cleanup.
7. On a lightly floured surface, roll out one chilled dough disk to about ¼-inch thickness using a rolling pin.
8. Use your favorite cookie cutters (stars, hearts, trees) to cut shapes and arrange them on the prepared baking sheets.
9. In the center of each shape, employ a smaller cookie cutter or a sharp knife to carve out a tiny “window,” then gently remove the inner piece.
10. Evenly fill the openings with crushed hard candies, making sure pieces are pea-sized to prevent overflow.
11. Repeat the rolling, cutting, and filling process with the second disk of dough.
12. Bake for 8–10 minutes, or until the edges of the cookies turn just golden and the candy centers melt into a smooth, glass-like finish.
13. Let the cookies cool on the baking sheets for 5 minutes so the candy sets, then transfer to wire racks to cool completely.
14. While still warm, if desired, sprinkle colored sugar over the candy centers for an extra twinkle.
Serving Suggestions
These Stained Glass Sugar Cookies are a showstopper on any dessert table. Whether you’re hosting a holiday party or simply craving a sweet treat, try these ideas to elevate your presentation:
- Holiday Platter: Arrange cookies on a festive serving tray lined with evergreen sprigs for a rustic, seasonal display.
- Gift Boxes: Stack cooled cookies between layers of parchment paper in a decorative tin or cellophane bag tied with ribbon for thoughtful homemade presents.
- Cozy Pairing: Serve alongside a mug of hot cocoa or chai tea to complement the sweet, buttery flavors and lend warmth to chilly gatherings.
- Dessert Buffet: Mix with other holiday sweets—like peppermint bark and gingerbread men—on a tiered stand to create a colorful, eye-catching spread.
Tips For Perfect Stained Glass Sugar Cookies
Turning simple sugar cookies into luminous works of art is easier than it looks, but a few insider tricks can make all the difference. Keep your workspace organized, measure ingredients precisely, and don’t rush the chilling step—your dough will thank you by holding its shape. These pointers will help you achieve crisp edges, even candy fills, and cookies that look as dazzling as they taste:
- These cookies make a delightful holiday treat that can be packaged as gifts.
- You can experiment with different candy colors for a more vibrant stained glass effect.
- Ensure that the crushed candies are finely ground to prevent them from overflowing during baking.
- These cookies can be decorated with icing for added flair if desired.
How To Store It
Once you’ve enjoyed the sparkle and sweetness of these cookies, proper storage will keep them fresh and colorful for days:
- Airtight Container at Room Temperature: Place cooled cookies in a single layer or separated by parchment paper. Store for up to five days.
- Freeze for Longer Keeps: After cooling, layer cookies with parchment sheets in a freezer-safe container and freeze for up to one month.
- Gentle Thawing: Remove frozen cookies and let them sit at room temperature for 30 minutes before serving to preserve the candy’s glossy finish.
- Avoid Moisture: Keep away from humid areas and don’t refrigerate, as moisture can dull the candy centers and soften the cookie edges.
Frequently Asked Questions
Got questions? Here are quick answers to common baking bumps so your cookies turn out perfect every time.
- Why is it important to chill the dough before rolling it out?
Chilling the dough for at least one hour firms up the butter, which helps prevent the cookies from spreading too much in the oven. It also makes the dough easier to handle and roll out to an even ¼-inch thickness. If you skip this step, your cookies may puff or lose their shape, and the candy centers could overflow during baking.
- How finely should I crush the hard candies, and what’s the best way to do it?
Aim for small, pea-sized pieces so the candy melts uniformly without seeping out of the window openings. Place the candies in a sealed plastic bag and gently tap them with a rolling pin or use a food processor on a low pulse setting. Avoid crushing them into a fine powder, which can burn quickly and lose its translucent effect.
- Can I substitute the hard candies with other ingredients for the stained glass effect?
While hard candies like Jolly Ranchers or Lifesavers give the best translucent, colorful finish, you can experiment with clear sugar melts or candy wafers as an alternative. Keep in mind that different candies have varying melting points and colors. If you use sugar wafers, crush them similarly and watch closely during baking to achieve a glossy appearance without browning.
- My cut-out shapes sometimes crack or stick when I lift them off the counter. How can I avoid this?
To prevent cracks, ensure the dough is evenly chilled and rolled out on a lightly floured surface. If the dough sticks, dust your rolling pin and surface with a bit more flour, but avoid over-flouring, which can dry out the dough. If cracks appear, gently press them back together with your fingers or a small dab of water before baking.
- The candy centers occasionally bubble up and overflow. What causes that, and how do I fix it?
Overflow happens when the candy pieces are too large or packed too tightly, causing excess melting. Use smaller candy fragments, fill each window just to the top edge, and tap off any excess before baking. Baking on parchment paper also helps you easily remove any spilled candy drips after the cookies come out of the oven.
- How should I store these cookies, and how long will they stay fresh?
Once completely cooled, store the cookies in an airtight container at room temperature. They will stay fresh and maintain their stained glass shine for up to five days. For longer storage, layer the cookies with parchment paper between them and freeze for up to one month. Thaw at room temperature before serving.
- Can I decorate the cookies with icing or colored sugar after baking?
Yes, you can add royal icing details or sprinkle colored sanding sugar on the warm cookies for extra flair. If using icing, wait until the cookie and candy center are fully cooled so the icing won’t run. For sanding sugar, lightly brush the warm surface with a tiny amount of corn syrup or lightly mist with water so the sugar adheres without melting the candy.
- What can I do if my cookies brown too quickly or the candy doesn’t fully melt?
Oven temperatures can vary, so use an oven thermometer to ensure you’re at a consistent 350°F (175°C). If the edges brown before the candy melts, lower the temperature by 5–10°F and bake a minute or two longer. Conversely, if the candy center isn’t fully melted after 10 minutes, increase the temperature slightly or place the tray on the middle rack rather than the top one for more even heat distribution.
What Makes This Special
There’s something undeniably joyful about cracking into a sugar cookie to reveal a glossy window of rainbow candy— it’s like a holiday surprise in every bite! This recipe works because it balances buttery richness, tender crumb, and vibrant sweetness while allowing you to customize shapes and colors for any occasion. Keep this article printed or bookmarked, gather your favorite cutters and candies, and make a batch to dazzle friends and family. Let me know how your stained glass adventures go—drop a comment with your tips, questions, or creative twists!
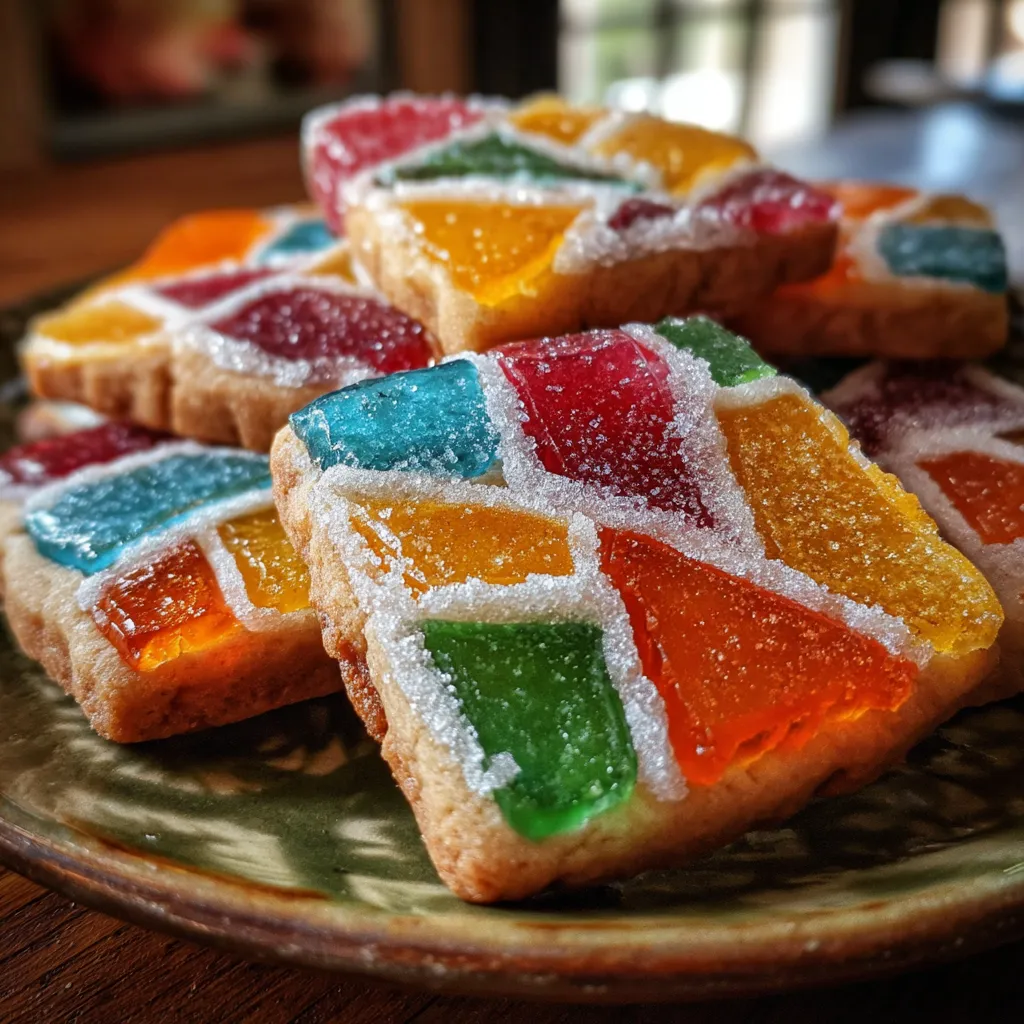

Stained Glass Sugar Cookies
Description
Shatter colorful hard candies into luminous inserts that melt into jewel-like windows within buttery sugar cookies. Each bite offers a crisp edge, tender crumb, and glossy swirls of vibrant sweetness.
Ingredients
Instructions
-
In a large mixing bowl, cream together the softened butter and granulated sugar using an electric mixer until light and fluffy, approximately 2-3 minutes.
-
Beat in the egg and vanilla extract until well combined.
-
In a separate bowl, whisk together the all-purpose flour, baking powder, and salt.
-
Gradually add the dry ingredients to the wet mixture, mixing until just combined. Do not overmix.
-
Divide the dough into two equal portions, flatten each into a disk, wrap in plastic wrap, and refrigerate for at least 1 hour or until firm.
-
Preheat your oven to 350°F (175°C) and line baking sheets with parchment paper.
-
On a lightly floured surface, roll out one disk of dough to a thickness of about ¼ inch using a rolling pin.
-
Using cookie cutters, cut out desired shapes (such as stars, hearts, or Christmas trees) and place them on the prepared baking sheets.
-
In the center of each cut-out shape, use a smaller cookie cutter or a knife to create a smaller window shape. Remove the inner cut-out piece.
-
Fill the cut-out shapes with crushed hard candies, enough to fill the openings without overflowing.
-
Repeat rolling and cutting with the second dough disk.
-
Bake the cookies in the preheated oven for 8-10 minutes, until the edges are lightly golden and the candy has melted into a glass-like appearance.
-
Allow the cookies to cool on the baking sheets for 5 minutes before transferring them to wire racks to cool completely.
-
If desired, sprinkle colored sugar on top of the cookies while they are still warm for an extra decorative touch.
Note
- These cookies make a delightful holiday treat that can be packaged as gifts.
- You can experiment with different candy colors for a more vibrant stained glass effect.
- Ensure that the crushed candies are finely ground to prevent them from overflowing during baking.
- These cookies can be decorated with icing for added flair if desired.

