

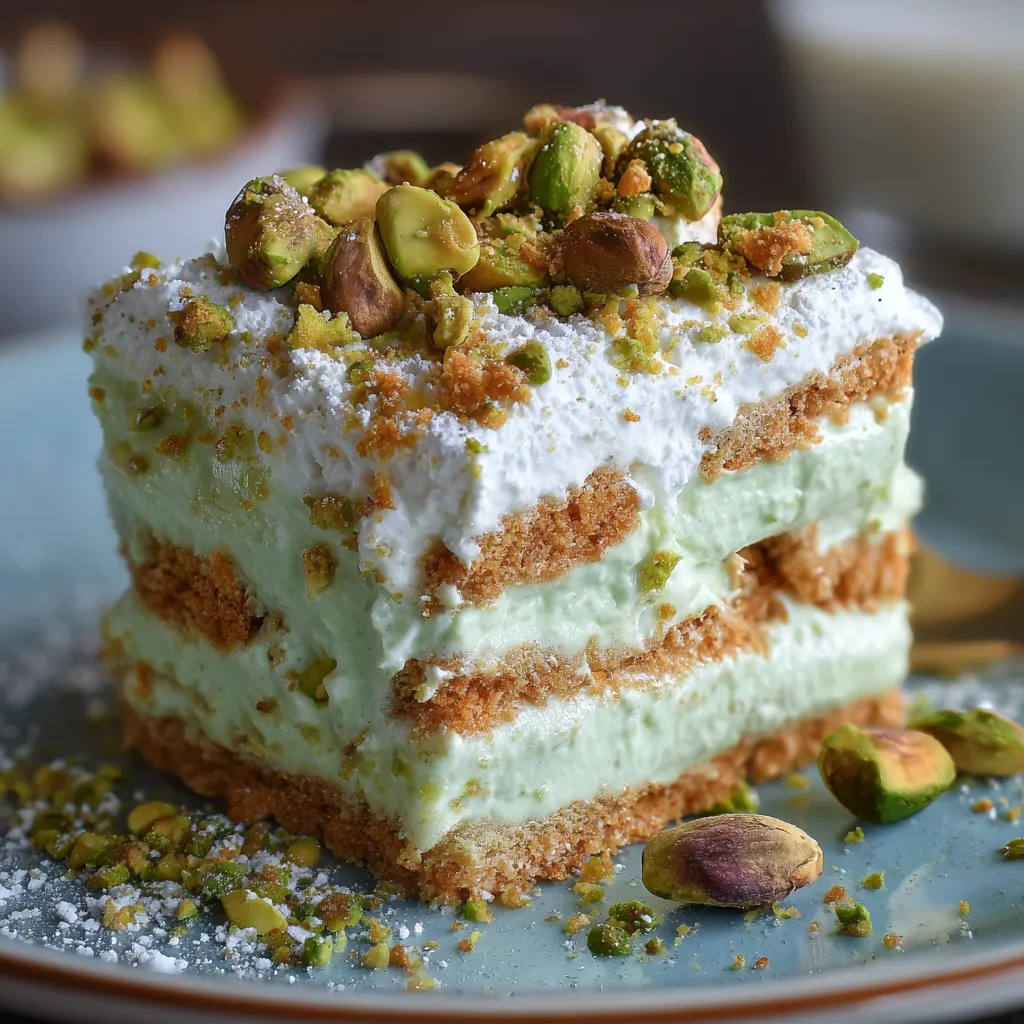
No-Bake Layered Creamy Pistachio Lush greets your dessert dreams with a vibrant pistachio cream cheese layer set atop a crisp graham cracker crust, finished with pillowy whipped cream and nutty pistachio pieces. This dreamy pistachio-cream cheese filling swirled with billowy whipped cream rests on a buttery graham cracker base, all crowned by crunchy nuts—an effortless no-bake treat perfect for potlucks, special occasions, or simply satisfying a sweet craving without heating up the kitchen.
Key Ingredients
Let’s meet the handful of everyday ingredients that build this lush, no-bake dessert. Each one brings its own flavor, texture, and visual charm to the final slice.
- 1 1/2 cups graham cracker crumbs: Crisp, buttery base that forms the perfect foundation for the lush layers.
- 1/4 cup granulated sugar: Adds just enough sweetness to balance the nuttiness of the pistachio.
- 6 tablespoons melted unsalted butter: Binds the crumbs together and brings a rich mouthfeel to the crust.
- 8 ounces cream cheese, softened: Provides a tangy, creamy canvas for the pistachio pudding.
- 3.4 ounces instant pistachio pudding mix: Delivers vibrant flavor and helps thicken the filling.
- 1 1/2 cups cold milk: Activates the pudding mix and ensures a smooth, silky texture.
- 1 cup heavy cream: Whipped into clouds of decadent fluff that lighten up the cheesecake layer.
- 2 tablespoons powdered sugar: Sweetens and stabilizes the whipped cream for firm peaks.
- 1/2 teaspoon vanilla extract: Enhances the overall flavor with a warm, floral note.
- 1/2 cup chopped pistachios: Adds a crunchy, nutty topping to finish the dessert in style.
How To Make No-Bake Layered Creamy Pistachio Lush
Ready to assemble this showstopper? You’ll start by crafting a sturdy graham cracker crust, then whip up a silky pistachio-cream cheese filling before folding in cloud-like whipped cream. Finally, you’ll layer, chill, and top with chopped pistachios for that irresistible crunch. These six simple steps will guide you from crumb to creamy perfection—no oven required!
1. In a medium bowl, combine graham cracker crumbs, granulated sugar, and melted butter, stirring until the mixture resembles wet sand. Press firmly into the bottom of an 8×8-inch dish using the back of a spoon or a flat measuring cup. Chill for 10 minutes to set the base.
2. In a separate bowl, beat the softened cream cheese until completely smooth, then whisk in the instant pistachio pudding mix. Gradually pour in the cold milk, stirring constantly until the mixture thickens into a velvety filling.
3. Place another bowl in the fridge for a few minutes, then whip the heavy cream, powdered sugar, and vanilla extract on medium-high speed until you see stiff, glossy peaks form.
4. Gently fold the whipped cream into the pistachio-cream cheese mixture with a rubber spatula, using sweeping motions to keep the texture light and airy. Pour or spoon the mixture over the chilled crust and spread evenly.
5. Refrigerate the assembled dessert for at least 2 hours to allow the layers to firm up and flavors to meld.
6. Just before serving, sprinkle the chopped pistachios all over the top for a festive, crunchy finish. Slice into neat squares and enjoy!
Serving Suggestions
When it’s time to serve this creamy pistachio delight, presentation can elevate each bite. Whether you’re spoiling brunch guests or bringing dessert to a gathering, these ideas will help you showcase your lush creation in style.
- Serve chilled slices on a decorative platter to highlight the distinct layers and keep every bite refreshing.
- Garnish with mint leaves and a light dusting of powdered sugar for a pop of color and extra elegance.
- Drizzle honey over each piece to amplify the nutty sweetness and add a glossy finish.
- Pair with a warm beverage like matcha latte, green tea, or espresso to contrast the cool creaminess with a soothing sip.
Tips For Perfect No-Bake Layered Creamy Pistachio Lush
Getting each layer just right is easier than you think! Follow these insider tips to achieve beautiful slices, a stable filling, and maximum flavor. Think of these pointers as your dessert-making best friends, guiding you toward that picture-perfect, no-bake success.
- Press the crust firmly to ensure clean slices when serving
- Chill the assembled dessert at least 2 hours for best firmness
- Use full-fat cream cheese for a creamier texture
- Store leftovers covered in the refrigerator for up to 3 days
How To Store It
Proper storage keeps your No-Bake Layered Creamy Pistachio Lush tasting as fresh as the day you made it. Whether you’re saving leftovers or planning ahead, these tips will preserve texture and flavor so every slice stays dreamy.
- Refrigerate in an airtight container to prevent odors from transferring and to maintain the lush creaminess for up to three days.
- Cover the dish with plastic wrap, pressing gently on the surface of the whipped layer to keep it from forming a skin.
- Avoid freezing when possible, since whipped cream can separate and become grainy upon thawing—if you must, wrap tightly and expect slight texture changes.
- Let chilled slices sit at room temperature for 5–10 minutes before serving to bring out their full creamy richness.
Frequently Asked Questions
Here are answers to the most common questions about making and serving this fun, no-bake dessert.
- Q: How long does it take to prepare this recipe?
A: Total hands-on time is about 20–25 minutes, including mixing the crust, beating the cream cheese, whipping the cream, and assembling the layers. You’ll need an additional 10 minutes to chill the crust before adding the filling, plus at least 2 hours of refrigeration to let the dessert set properly.
- Q: Can I substitute any of the ingredients in this recipe?
A: You can swap the granulated sugar in the crust for brown sugar for a richer flavor, but the pistachio pudding mix must remain instant for proper thickening. Full-fat cream cheese and heavy cream are recommended for the best creamy texture; low-fat versions may result in a runnier filling. If you prefer a different flavor, you could experiment with almond or vanilla pudding, though that will alter the pistachio profile.
- Q: How do I get clean, neat slices when serving?
A: Pressing the crust firmly into the dish and chilling it for at least 10 minutes helps create a solid base. After the full 2-hour chill, run a sharp knife under hot water, wipe it dry, and slice in straight, decisive strokes. Wipe the blade between cuts to prevent smearing.
- Q: What’s the best way to whip the cream so it holds stiff peaks?
A: Start with a chilled bowl and cold heavy cream straight from the fridge. Beat on medium speed until frothy, then add powdered sugar and vanilla and increase to high speed. Watch for firm, glossy peaks that stand straight when you lift the beaters—overbeating will turn it grainy, so stop as soon as peaks hold their shape.
- Q: Can I prepare this dessert ahead of time, and how should I store leftovers?
A: Yes, you can make it up to one day in advance—just cover the assembled dish with plastic wrap and refrigerate. Leftovers will stay fresh in an airtight container or covered dish for up to 3 days in the fridge. Allow refrigerated slices to sit at room temperature for 5–10 minutes before serving for the best mouthfeel.
- Q: Is freezing an option for longer storage?
A: Freezing isn’t recommended because the whipped cream layer can separate and become grainy upon thawing. If you must freeze, wrap tightly in plastic and aluminum foil, and thaw overnight in the refrigerator; expect some textural changes in the creamy layers.
What Makes This Special
This No-Bake Layered Creamy Pistachio Lush is a triumphant blend of textures and flavors—think buttery graham cracker crunch meeting tangy pistachio-infused cream cheese, all softened by pillowy whipped cream. Its effortless assembly means you’ll be crowned dessert hero without firing up the oven, and the vibrant green hue is sure to spark smiles. Feel free to print this recipe and tuck it into your collection for anytime bakers’ block. If you give it a whirl, drop a comment below or share your tips—you know we love cheering on your kitchen adventures!

No-Bake Layered Creamy Pistachio Lush
Description
A dreamy pistachio-cream cheese filling swirled with billowy whipped cream rests on a buttery graham cracker base, all crowned by crunchy nuts—an effortless no-bake treat.
Ingredients
Instructions
-
Combine graham cracker crumbs, granulated sugar, and melted butter in a bowl until the mixture is evenly moistened, then press firmly into the bottom of an 8x8 inch dish. Chill for 10 minutes.
-
In a separate bowl beat the softened cream cheese until smooth, then add the instant pistachio pudding mix and gradually pour in the cold milk, mixing until thickened.
-
In another chilled bowl whip the heavy cream, powdered sugar, and vanilla extract until stiff peaks form.
-
Gently fold the whipped cream into the pistachio-cream cheese mixture until fully combined, then spread evenly over the chilled crust.
-
Refrigerate for at least 2 hours to set.
-
Sprinkle the chopped pistachios over the top before slicing and serving.
Note
- Press the crust firmly to ensure clean slices when serving
- Chill the assembled dessert at least 2 hours for best firmness
- Use full-fat cream cheese for a creamier texture
- Store leftovers covered in the refrigerator for up to 3 days

