

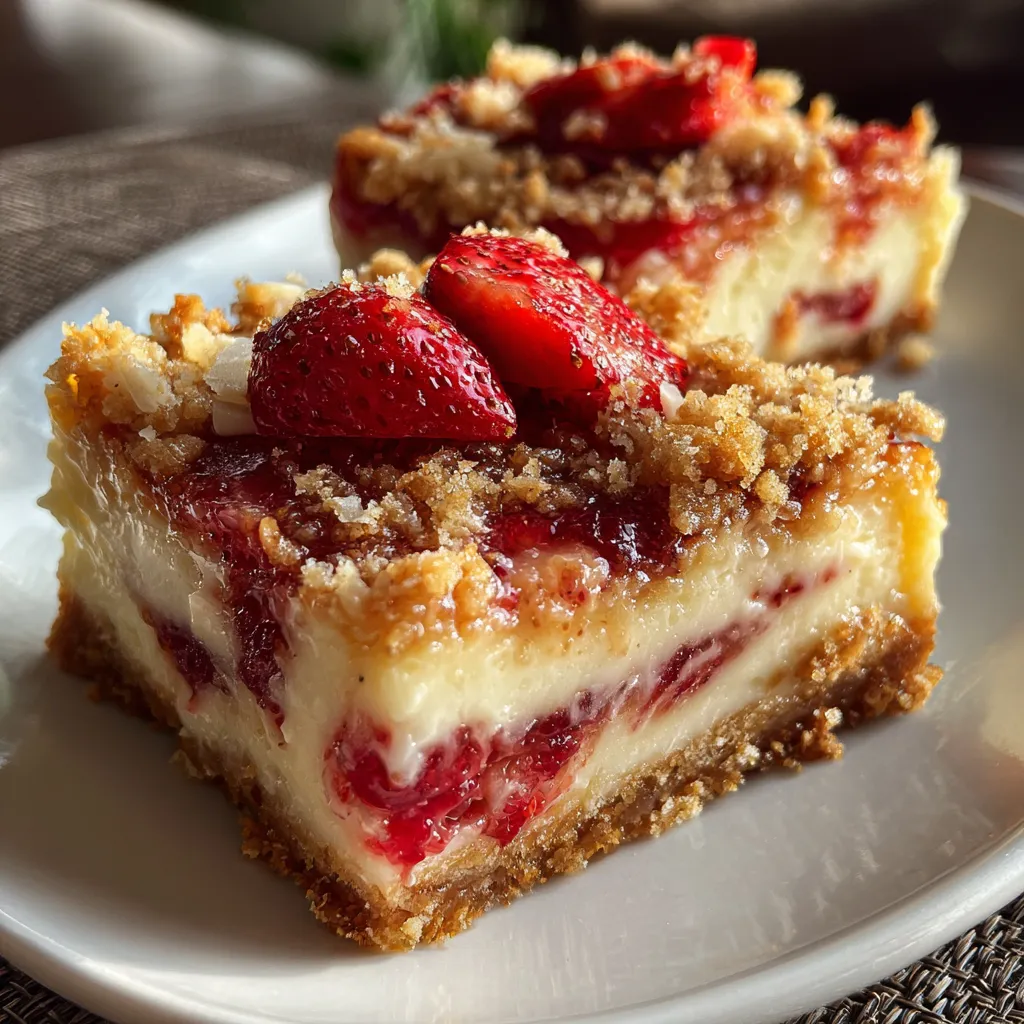
Craving a dessert that balances a crisp graham cracker crust, a rich cream cheese filling, and vibrant swirls of fresh strawberry? These Strawberry Cheesecake Bars deliver creamy layers of tangy cheesecake on a buttery graham crust meet ribbons of fresh strawberry swirl in every bite. With each forkful bursting with fruity sweetness, you’ll fall in love with how simple ingredients transform into a show-stopping treat. Ready to dive in and impress your friends (or just treat yourself)? Let’s get baking!
Key Ingredients
Before you begin, gather these simple components to create your Strawberry Cheesecake Bars:
- 1 1/2 cups graham cracker crumbs: Forms a crisp, buttery base that holds your cheesecake layer together.
- 1/3 cup granulated sugar: Sweetens the crust and balances the tang of the filling.
- 6 tablespoons unsalted butter, melted: Binds the graham crumbs into a sturdy, golden crust.
- 16 ounces cream cheese, softened: Provides the luxurious, tangy foundation of the cheesecake filling.
- 2/3 cup granulated sugar: Ensures a silky-smooth filling with just the right amount of sweetness.
- 2 large eggs: Gives structure and richness to help the filling set perfectly.
- 1 teaspoon vanilla extract: Infuses warm, aromatic flavor into the cheesecake layer.
- 1/2 cup sour cream: Adds extra tang and creaminess for a velvety texture.
- 1 cup fresh strawberries, hulled and chopped: Brings vibrant color and fruity sweetness for the swirl.
- 2 tablespoons granulated sugar: Sweetens the strawberry topping and helps it thicken.
- 1 teaspoon lemon juice: Brightens the strawberry swirl with a touch of acidity.
How To Make Strawberry Cheesecake Bars
Baking these bars is a breeze once you have your crust pressed, your filling whipped, and your strawberry swirl ready. In just a few simple stages—preparing the crust, whipping up the cheesecake layer, simmering the berries, and combining it all—you’ll create a dessert that looks and tastes like it came from a gourmet bakery. Follow the steps below for perfect bar after bar.
1. Preheat the oven to 350°F and line an 8×8-inch baking pan with parchment paper, leaving an overhang for easy removal.
2. In a medium bowl, mix the graham cracker crumbs, 1/3 cup sugar, and melted butter until the crumbs are evenly coated and resemble wet sand.
3. Press the crumb mixture firmly into the bottom of the prepared pan using the back of a spoon or your fingers, then bake for 10 minutes. Remove and let the crust cool completely.
4. In a large bowl, beat the softened cream cheese and 2/3 cup sugar on medium speed until smooth and free of lumps. Add eggs one at a time, mixing well after each addition to maintain a silky texture.
5. Stir in the vanilla extract and sour cream until the filling is creamy and uniform, scraping down the sides of the bowl for an even consistency.
6. Spread the cheesecake filling evenly over the cooled crust, smoothing the top with an offset spatula for a flawless finish.
7. In a small saucepan over medium heat, combine the chopped strawberries, 2 tablespoons sugar, and lemon juice. Stir constantly until the mixture begins to thicken slightly, about 5 minutes, then remove from heat and let cool briefly.
8. Drop spoonfuls of the strawberry mixture onto the cheesecake layer, then use a knife or skewer to swirl the fruit through the filling, creating a marbled effect.
9. Bake for 25–30 minutes until the edges are set and lightly golden, while the center remains just slightly jiggly when you gently shake the pan.
10. Allow the bars to cool to room temperature on a wire rack, then refrigerate for at least 2 hours before slicing into neat squares.
Serving Suggestions
These bars are as versatile as they are delicious. Here are a few ways to present them:
- Dust with powdered sugar just before serving for a delicate, snowy finish that enhances sweetness.
- Top with fresh strawberry slices and a sprig of mint for a pop of color and freshness.
- Serve alongside whipped cream or a dollop of Greek yogurt to balance the richness with light creaminess.
- Pair with a scoop of vanilla ice cream for an indulgent twist that makes this dessert feel like a sundae.
Tips For Perfect Strawberry Cheesecake Bars
So you’re halfway through and want those bars to look and taste like a pro’s? Keep these friendly tips in mind as you bake. A little patience and a few smart tweaks will turn a simple dessert into your signature showstopper.
- Allow bars to chill completely for clean slices. Patience here means sharper, photo-ready edges.
- Substitute raspberries for strawberries if desired. The same marbling trick works beautifully with other berries.
- Store in an airtight container in the refrigerator for up to 5 days. This keeps the filling firm and the crust crisp.
- For extra sweetness, dust the bars with powdered sugar before serving or add a light honey drizzle right before plating.
How To Store It
To keep your Strawberry Cheesecake Bars tasting just-baked fresh, proper storage is key. Whether you’re planning ahead for a party or saving leftovers, follow these methods to maintain maximum flavor and texture.
- Refrigerator: Place cooled bars in an airtight container and store for up to 5 days. This keeps the filling firm and the crust crisp.
- Freezer (whole pan): Wrap the entire pan tightly in plastic wrap and aluminum foil. Freeze for up to 1 month, then thaw overnight in the refrigerator.
- Freezer (individual slices): Layer slices between parchment paper in a container to prevent sticking. Grab-and-go treats are ready whenever you need a sweet bite.
- Room temperature rest: Before serving, let refrigerated bars sit at room temperature for 10–15 minutes to soften slightly and enhance the creamy texture.
Frequently Asked Questions
Here are answers to the most common questions about these bars:
- How long does it take to prepare, bake, and chill these strawberry cheesecake bars?
The total time breaks down into about 15 minutes for preparation (mixing crust and filling, chopping strawberries), 10 minutes to bake the crust, 25–30 minutes to bake the assembled bars, and at least 2 hours of refrigeration for chilling. In sum, you should allow around 3 hours from start to finish, including cool-down time, to ensure the bars set properly.
- How can I achieve clean, neat slices when serving?
For clean slices, chill the bars for the full 2 hours or even overnight. Run a sharp knife under hot water, dry it, and make each cut in one smooth motion, wiping the blade clean between cuts. This prevents filling residue from smearing and yields crisp edges.
- Can I substitute ingredients, such as using raspberries or gluten-free crumbs?
Yes. You can swap fresh raspberries for strawberries using the same quantity and cooking method in step 7. For a gluten-free version, replace the graham cracker crumbs with certified gluten-free graham or digestive biscuit crumbs. If you prefer a lower-sugar dessert, try a granulated sugar substitute cup-for-cup in both the crust and filling without significantly affecting texture.
- How do I know when the cheesecake bars are fully baked?
The edges of the cheesecake should be set and lightly golden, while the center remains just slightly jiggly when you gently shake the pan. The jiggle should be subtle—overbaking causes cracking, while underbaking yields a soupy center. Remove the bars promptly once you see this balance, then allow them to cool at room temperature before chilling.
- Can I use frozen strawberries instead of fresh ones?
You can, but thaw and drain the frozen strawberries first to remove excess liquid; otherwise, the topping may become too runny. Pat the berries dry with paper towels, then proceed to cook with sugar and lemon juice. Keep an eye on cooking time—it may be slightly longer to reach the desired thickness.
- What’s the best way to store leftovers, and how long will they keep?
Store cooled bars in a single layer or stacked with parchment paper between layers in an airtight container. They’ll stay fresh in the refrigerator for up to 5 days. Before serving, you can let them sit at room temperature for 10–15 minutes to soften slightly or dust with powdered sugar for an extra touch.
- Can I prepare these bars ahead of time or freeze them?
Yes. After baking and initial cooling, wrap the entire pan tightly with plastic wrap and foil, then freeze for up to 1 month. To serve, thaw overnight in the refrigerator, then slice. Alternatively, freeze individual slices between parchment sheets for easy grab-and-go treats.
What Makes This Special
These Strawberry Cheesecake Bars nail the sweet-tangy balance that keeps everyone coming back for more. The buttery graham crust gives just enough crunch, while the velvety cheesecake layer and vibrant strawberry swirls feel like a hug in dessert form. Whether you’re sharing at a potluck or sneaking squares straight from the fridge, this recipe works every time. Go ahead, print this out and save it—then drop a comment below when you bake them, because I want to hear about your flavor twists, triumphs, and happy taste-testers!

Strawberry Cheesecake Bars
Description
A crisp graham cracker base holds a rich, velvety cream cheese filling, threaded with vibrant strawberry ribbons that burst with fruity sweetness in each forkful.
Ingredients
Instructions
-
Preheat oven to 350°F and line an 8×8-inch baking pan with parchment paper.
-
In a bowl, mix graham cracker crumbs, 1/3 cup sugar, and melted butter until combined.
-
Press the crumb mixture firmly into the bottom of the prepared pan and bake for 10 minutes, then let cool.
-
In a large bowl, beat cream cheese and 2/3 cup sugar until smooth, then add eggs one at a time, mixing well after each addition.
-
Stir in vanilla extract and sour cream until the filling is creamy and uniform.
-
Spread the cheesecake filling evenly over the cooled crust.
-
In a small saucepan, combine strawberries, 2 tablespoons sugar, and lemon juice; cook over medium heat, stirring, until mixture thickens slightly, about 5 minutes, then cool briefly.
-
Drop spoonfuls of the strawberry mixture onto the cheesecake layer and use a knife to swirl it through the filling.
-
Bake for 25–30 minutes until the edges are set and the center is just slightly jiggly.
-
Allow the bars to cool to room temperature, then refrigerate for at least 2 hours before slicing.
Note
- Allow bars to chill completely for clean slices.
- Substitute raspberries for strawberries if desired.
- Store in an airtight container in the refrigerator for up to 5 days.
- For extra sweetness, dust the bars with powdered sugar before serving.

