

Key Lime Cookies with Lime Glaze deliver tangy key lime cookies with a zesty glaze that balances sweetness and citrus freshness in every bite. Butter-rich cookies burst with bright lime zest, then get topped with a glossy key lime glaze that glistens and adds a sweet-tart finish. Warm from the oven, they boast crisp edges and tender centers. Ready in under an hour and perfect for beginner bakers, these treats will brighten any afternoon snack or dessert table. Grab your citrus, fire up the oven, and let’s dive into this irresistible citrus dessert!
Key Ingredients
To whip up these Key Lime Cookies with Lime Glaze, you'll need a handful of pantry staples and fresh key lime flavor boosters. Each ingredient plays an important role in creating the perfect tender cookie base and that signature zesty glaze.
- 1 1/2 cups all-purpose flour: Provides structure and a tender crumb for the cookies.
- 1 teaspoon baking powder: Gives a gentle lift so cookies spread just the right amount.
- 1/4 teaspoon salt: Balances sweetness and enhances all the other flavors.
- 1/2 cup unsalted butter, softened: Adds richness and creates a buttery, melt-in-your-mouth texture.
- 3/4 cup granulated sugar: Sweetens the dough and helps achieve light, airy cookies.
- 1 large egg: Binds ingredients and contributes to a soft, chewy center.
- 1 tablespoon key lime zest: Infuses bright citrus oils for authentic key lime flavor.
- 2 tablespoons key lime juice: Adds tangy acidity to the dough for a refreshing zing.
- 1 teaspoon vanilla extract: Rounds out flavors with a warm, sweet aroma.
- 1 cup powdered sugar: Forms the base of a smooth, glossy glaze.
- 2 tablespoons key lime juice: Brings bright tartness to the glaze for sweet-tart contrast.
- 1 teaspoon milk: Thins the glaze to a perfect drizzleable consistency.
How To Make Key Lime Cookies with Lime Glaze
You’re just a few simple steps away from buttery cookies bursting with citrusy brightness and crowned with a sweet-tart glaze. From mixing the dough to dunking or drizzling the glaze, these instructions walk you through every detail—no baker’s degree required!
1. Preheat and prepare: Preheat the oven to 350°F and line a baking sheet with parchment paper to prevent sticking.
2. Combine dry ingredients: In a medium bowl, whisk together the flour, baking powder, and salt until evenly blended.
3. Cream butter and sugar: In a separate bowl, use a mixer to cream the softened butter and granulated sugar until light, fluffy, and pale in color.
4. Add wet flavorings: Beat in the egg, key lime zest, 2 tablespoons key lime juice, and vanilla extract until the mixture is smooth and homogenous.
5. Incorporate dry mix: Gradually add the flour mixture to the wet ingredients, mixing on low speed until just combined—avoid over-mixing.
6. Portion the dough: Scoop tablespoonfuls of dough and place them about 2 inches apart on the prepared sheet to allow room for spreading.
7. Bake to perfection: Bake for 10–12 minutes or until the edges are set and the centers turn just lightly golden.
8. Initial cooling: Let the cookies rest on the baking sheet for 5 minutes to finish setting before transferring to a wire rack.
9. Whisk the glaze: While cookies cool, whisk together the powdered sugar, 2 tablespoons key lime juice, and milk until smooth and pourable.
10. Glaze the cookies: Dip the tops of the cooled cookies into the glaze or hold a spoon over them to create delicate drizzles.
11. Set and enjoy: Return glazed cookies to the wire rack and let the glaze firm up before serving for a perfect finish.
Serving Suggestions
Once your Key Lime Cookies with Lime Glaze are ready, presentation takes them from cute to unforgettable. Whether you’re hosting a backyard brunch or just treating yourself, here are four fun ways to serve:
- Serve on a rustic wooden board: Arrange cookies in a neat grid and garnish with extra lime slices for a coastal vibe.
- Plate with fresh berries: Add strawberries or raspberries for a pop of color and sweet-tart contrast.
- Pair with iced tea or lemonade: The bright citrus notes in the cookies complement cool, refreshing beverages perfectly.
- Box as party favors: Stack cookies in mini boxes tied with twine for a charming gift or dessert table accent.
Tips For Perfect Key Lime Cookies with Lime Glaze
Baking these treats is easy, but a few insider tweaks can elevate them from great to “wow!” Fresh ingredients and proper chilling make a real difference, while smart mixing and timing ensure every bite is tender and bright. Keep these friendly pointers in mind the next time you dive into the dough.
- Fresh key lime zest and juice give the best flavor but bottled juice works in a pinch.
- For thicker cookies, chill the dough for 30 minutes before baking to limit spread.
- Store cooled cookies in an airtight container for up to three days to maintain chewiness.
- Extra glaze can be refrigerated in a sealed container for up to one week—just whisk before using.
How To Store It
Proper storage keeps your Key Lime Cookies with Lime Glaze tasting as fresh as day one. Whether you’re saving leftovers or prepping ahead for a party, follow these tips to lock in flavor and texture.
- Room-temperature container: Once glaze has fully set, store cookies in a single layer in an airtight container at room temperature for up to three days.
- Refrigerate glaze: Keep any leftover glaze in a sealed jar in the fridge for up to one week; whisk before drizzling.
- Freeze dough balls: Scoop and freeze raw dough on a parchment-lined tray, then transfer to a freezer bag for up to three months—bake from frozen, adding 1–2 minutes to baking time.
- Freeze baked cookies: Layer cooled, unglazed cookies between parchment in an airtight container; freeze up to two months and thaw before glazing.
Frequently Asked Questions
Here are quick answers to the most common questions about these zesty cookies:
- How long does it take to prepare and bake these Key Lime Cookies with Lime Glaze?
From start to finish you’ll need about 15 minutes to gather and prepare ingredients, 10–12 minutes for baking each batch, plus 5 minutes of cooling on the sheet and another 10 minutes for glazing and setting. In total you can expect around 40–45 minutes from prep to ready-to-eat cookies.
- Can I use bottled lime juice instead of fresh key lime juice and zest?
Yes, bottled lime juice and standard lime zest will work in a pinch, but fresh key lime juice and zest deliver brighter, more authentic flavor. If using bottled juice, taste and adjust—bottled varieties may be slightly less tart, so you might add a touch more powdered sugar to the glaze or an extra ½ teaspoon of juice to the dough, depending on your preference.
- What can I do to make these cookies thicker and chewier?
For thicker, chewier cookies, chill the cookie dough in the refrigerator for about 30 minutes before scooping. Chilled dough spreads less in the oven, resulting in a heartier texture. If you prefer an even thicker profile, shape the dough into slightly taller mounds when you place it on the baking sheet.
- How do I know when the cookies are perfectly baked?
The cookies are done when the edges are set and just begin to turn lightly golden while the centers still look soft. They will continue to firm up as they cool on the baking sheet for 5 minutes. If the centers brown noticeably, they’re slightly overbaked and may lose some of their tender texture.
- What’s the best way to store the cookies and the extra glaze?
Once the glaze is fully set, store the cookies in an airtight container at room temperature for up to three days. If you make extra glaze, keep it in a sealed jar in the refrigerator for up to one week; whisk it again before using if it thickens or separates.
- Can I freeze the dough or baked cookies?
Yes—scoop the raw dough onto a parchment-lined tray, freeze until solid, then transfer the frozen dough balls to a freezer-safe bag for up to 3 months. Bake them from frozen, adding 1–2 minutes to the baking time. You can also freeze fully baked cookies (unglazed) in an airtight container with parchment layers for up to 2 months; thaw at room temperature before glazing.
- How do I achieve the perfect consistency for the lime glaze?
The glaze should be thick enough to coat the back of a spoon but still pourable. Start by whisking the powdered sugar with 2 tablespoons of lime juice and 1 teaspoon of milk. If it’s too thin, add more powdered sugar 1 tablespoon at a time. If it’s too thick, add a few drops of milk until you reach your desired drizzling consistency.
What Makes This Special
What really sets these Key Lime Cookies with Lime Glaze apart is that perfect balance of buttery sweetness and tangy brightness—plus the irresistible pop of fresh key lime zest in every bite. They’re delightfully easy for beginner bakers yet impressive enough to wow your friends. Go ahead and print this guide to save for your next baking day, then drop a comment below if you try them or have any questions. Your feedback might just inspire the next zesty creation!
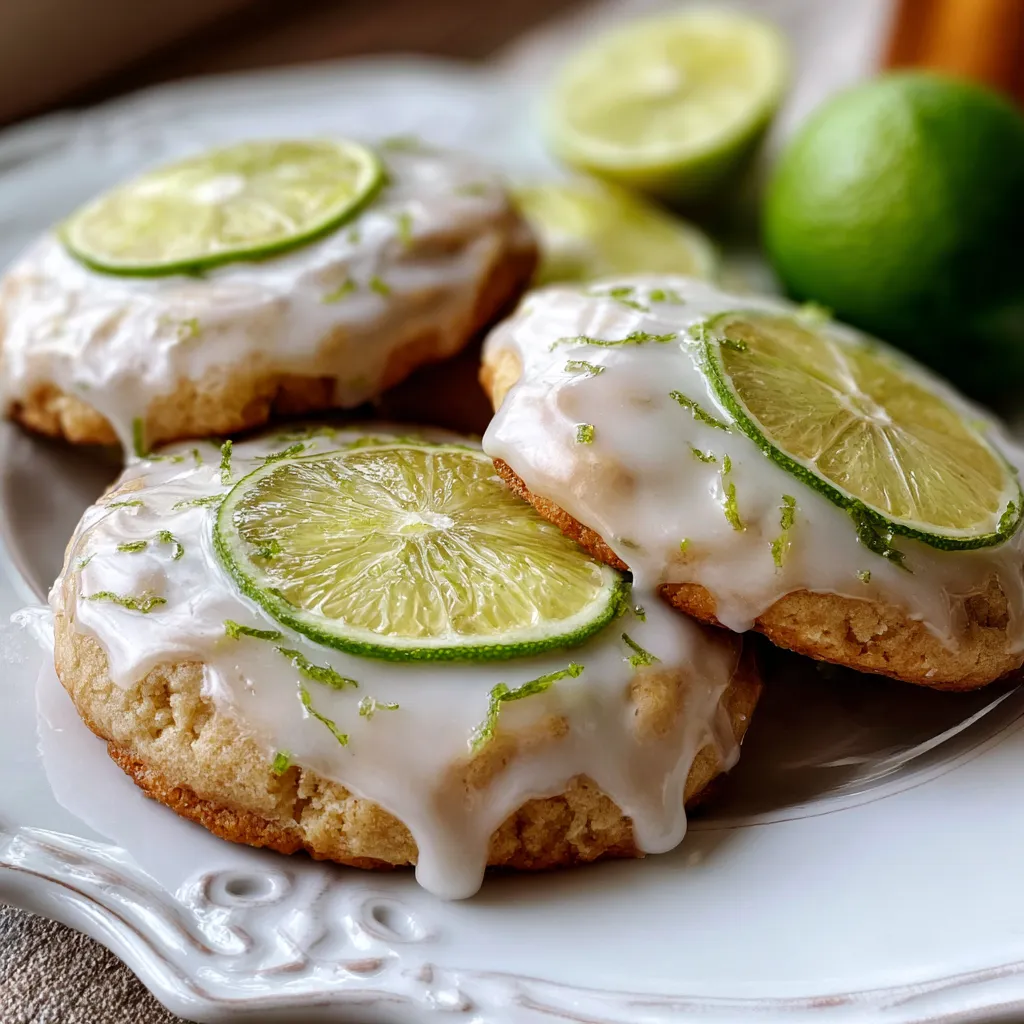

Key Lime Cookies with Lime Glaze
Description
Butter-rich cookies burst with bright lime zest, then get topped with a glossy key lime glaze that glistens and adds a sweet-tart finish. Warm from the oven, they boast crisp edges and tender centers.
Ingredients
Instructions
-
Preheat the oven to 350°F and line a baking sheet with parchment paper.
-
In a medium bowl whisk together the flour baking powder and salt.
-
In a separate bowl cream the butter and sugar until light and fluffy.
-
Beat in the egg lime zest lime juice and vanilla until smooth.
-
Gradually add the dry ingredients and mix until just combined.
-
Scoop tablespoonfuls of dough onto the prepared baking sheet spacing them about 2 inches apart.
-
Bake for 10 to 12 minutes or until edges are set and centers are lightly golden.
-
Cool the cookies on the baking sheet for 5 minutes then transfer to a wire rack.
-
Meanwhile whisk together the powdered sugar lime juice and milk until smooth to make the glaze.
-
Dip the tops of cooled cookies into the glaze or drizzle the glaze over them.
-
Place the glazed cookies back on the rack and let the glaze set before serving.
Note
- Fresh key lime zest and juice give the best flavor but bottled juice works in a pinch
- For thicker cookies chill the dough for 30 minutes before baking
- Store cooled cookies in an airtight container for up to three days
- Extra glaze can be refrigerated in a sealed container for up to one week

