

Smooth cheesecake filling swirls over a crispy graham crust in these fuss-free No-Bake Cheesecake Cups, glistening under fresh, juicy berries. Velvety cream cheese folded with whipped cream sits atop a buttery graham base, delivering a burst of color and zing in every bite. No baking required—just a bit of chilling time and a dash of ingenuity to satisfy your dessert cravings. Ready in hours, these cups are perfect for busy weeknights or last-minute gatherings—trust me, you’ll want to keep this tutorial handy!
Key Ingredients
Before you dive in, let’s gather what you need to build these dreamy cheesecake cups:
- 1 cup graham cracker crumbs: Crunchy foundation that forms the sturdy crust layer.
- 2 tablespoons granulated sugar: Adds a touch of sweetness to the crust, balancing the tangy filling.
- 3 tablespoons unsalted butter, melted: Binds the graham crumbs into a crisp, buttery crust.
- 8 ounces cream cheese, softened: The creamy centerpiece that gives the no-bake filling its rich, velvety texture.
- 1/4 cup granulated sugar: Sweetens the filling while allowing the cheesecake flavor to shine.
- 1/2 teaspoon vanilla extract: Infuses the filling with warm, aromatic flavor.
- 1/2 cup heavy whipping cream: Whipped to stiff peaks, it lightens the filling for a fluffy texture.
- Fresh berries for topping: Provides a bright, juicy burst of color and tang on each bite.
How To Make No-Bake Cheesecake Cups
Let’s walk through these eight simple steps for assembling your No-Bake Cheesecake Cups. You’ll create a crisp graham crust, whip up a silky filling, and chill everything to perfection. Keep tools chilled for the best whipped cream texture and taste the filling as you go to adjust sweetness to your liking!
1. In a medium bowl, combine the graham cracker crumbs and 2 tablespoons of granulated sugar, then pour in the melted butter. Stir thoroughly until every crumb is coated and the mixture resembles damp sand.
2. Divide the crumb mixture evenly among your serving cups. Use the back of a spoon or a small measuring cup to press firmly and form a solid, even crust layer in each cup.
3. In a separate bowl, beat the softened cream cheese with 1/4 cup granulated sugar and vanilla extract. Continue mixing on medium speed until the mixture is smooth, creamy, and free of lumps.
4. Chill another bowl and beaters in the freezer for about 10 minutes, then add the heavy whipping cream and whisk on medium-high speed until stiff peaks form.
5. Gently fold the whipped cream into the cream cheese mixture using a silicone spatula. Stop when fully combined and the filling is light and airy.
6. Spoon or pipe the cheesecake filling over the crust in each cup, filling them to the top for a neat presentation.
7. Cover or place the cups on a tray and refrigerate for at least two hours, or until the filling is set and holds its shape.
8. Just before serving, top each cheesecake cup with a handful of fresh berries for a pop of color and tart freshness.
Serving Suggestions
These cheesecake cups are perfect for a variety of occasions. Here are four ideas to elevate your presentation and taste:
- Serve these cups chilled straight from the fridge, arranging them on a decorative platter for an instant centerpiece.
- Add a spoonful of fruit compote on the side, drizzling lightly around each cup for a restaurant-style finish.
- Top with a sprig of fresh mint and a light dusting of powdered sugar just before serving to highlight the berry burst.
- Stack them on a tiered dessert stand to create a stunning display at parties, making it easy for guests to help themselves.
Tips For Perfect No-Bake Cheesecake Cups
It’s the little tricks that make these cups shine. Read through these friendly tips to get the creamiest filling, the crispiest crust, and the brightest berries every time!
- Assemble these cups a day ahead for a quick dessert option—flavors deepen overnight.
- For added brightness, stir in a teaspoon of lemon zest into the filling for a zingy twist.
- Store leftover cups covered in the refrigerator for up to three days to maintain that fresh texture.
- Swap the berries for a dollop of chocolate ganache or fruit compote for delicious variation.
How To Store It
Storing your No-Bake Cheesecake Cups correctly ensures every spoonful remains luscious and flavorful. Follow these methods to keep them at their best:
- Short-term refrigeration: Place the cheesecake cups in an airtight container or cover each cup with plastic wrap to keep them fresh for up to three days in the fridge.
- Label and date the container so you always grab the freshest batch first.
- Freezing: Transfer the cups to a freezer-safe container and freeze for up to one month, though the crust may soften slightly.
- Thawing: Move frozen cups to the refrigerator several hours before serving to let the filling regain its creamy consistency.
Frequently Asked Questions
Here are quick answers to your top questions about these cheesecake cups:
- Q: How long does it take to prepare and chill the cheesecake cups?
A: It takes about 15 minutes to prepare the crust and filling, then at least two hours chilling in the refrigerator for the filling to set. If you assemble ahead, refrigerate the cups overnight for best results.
- Q: Can I make these cheesecake cups ahead of time?
A: Yes, you can fully assemble the cheesecake cups a day in advance. After adding the filling over the crust, cover the cups tightly and refrigerate. They will stay fresh and creamy for up to three days when stored properly.
- Q: What if I don’t have graham cracker crumbs?
A: You can substitute with crushed digestive biscuits, vanilla wafers, or Oreo cookies without filling. Use one cup of any crushed cookie and combine it with two tablespoons of sugar and melted butter as directed to form the crust layer.
- Q: How do I ensure the whipped cream forms stiff peaks?
A: Chill the mixing bowl and beaters for about 10 minutes in the freezer before whipping. Start whipping the heavy cream on medium speed until it becomes frothy, then increase to high speed until stiff peaks hold their shape when you lift the beaters. Avoid overbeating to keep the texture smooth.
- Q: Can I add flavor variations to the filling?
A: Absolutely. Stir in a teaspoon of lemon zest or a splash of fruit puree into the cream cheese mixture before folding in the whipped cream. You can also gently fold in finely chopped nuts, a spoonful of cocoa powder, or flavored extracts like almond or peppermint for a custom twist.
- Q: How should I store leftover cheesecake cups?
A: Keep any leftover cups covered with plastic wrap or in an airtight container in the refrigerator. They will maintain the best texture for up to three days. Before serving again, let them sit at room temperature for about 10 minutes to soften slightly.
What Makes This Special
What really sets these No-Bake Cheesecake Cups apart is the effortless combination of a buttery graham crust, a cloud-like filling, and the pure joy of fresh berries bursting on your tongue. It’s a playful, no-fuss dessert that still feels utterly sophisticated—and you don’t even need to heat up the oven. Feel free to print this article and tuck it into your recipe binder for whenever you need a sweet victory. Have questions, tweaks, or rave reviews? Drop a comment below—I love hearing how your cups turn out!
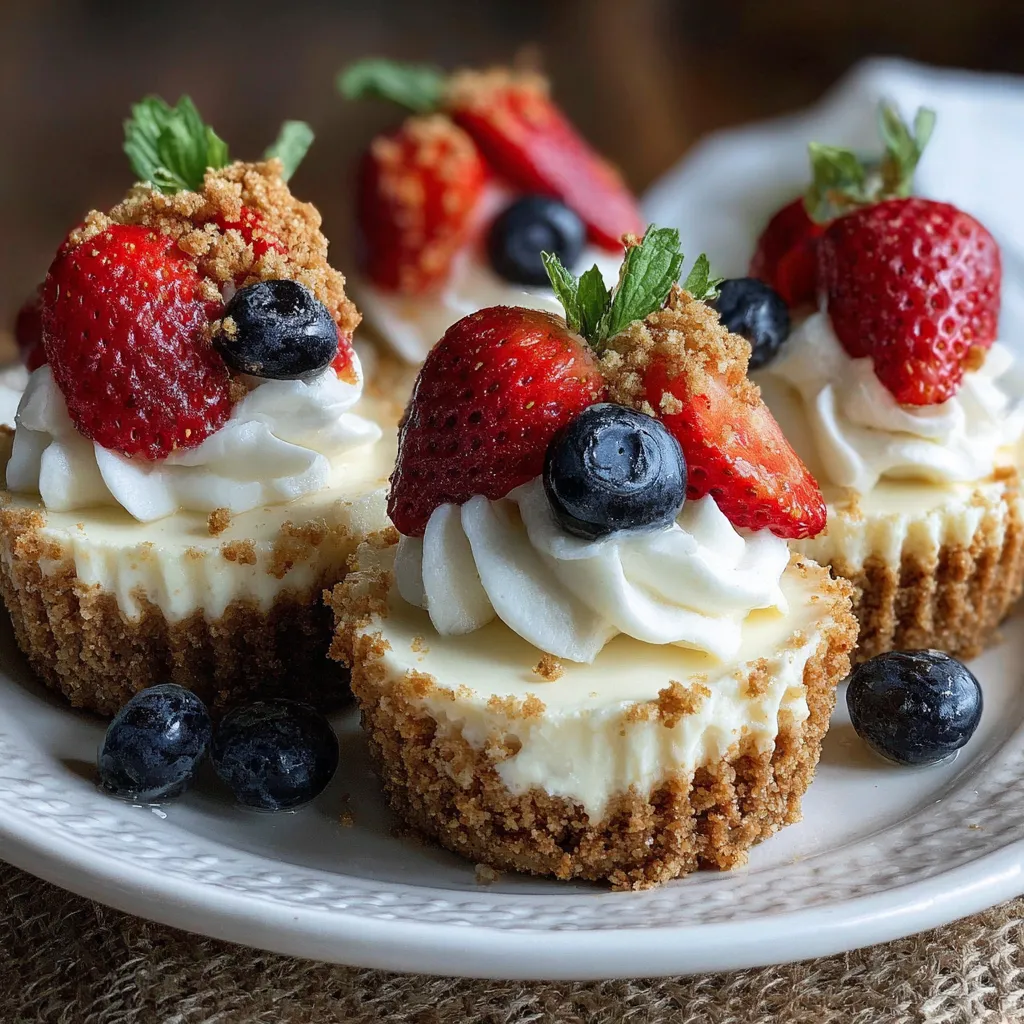

No-Bake Cheesecake Cups
Description
Velvety cheesecake folded with whipped cream sits atop a buttery graham crust, while tart berries add a burst of color and zing. No baking, no fuss—just chilled cups of creamy, vibrant sweetness ready in hours.
Ingredients
Instructions
-
In a bowl combine graham cracker crumbs and sugar then pour in melted butter and stir until crumbs are evenly coated.
-
Divide the crumb mixture among serving cups and press firmly to form a solid crust layer.
-
In a separate bowl beat cream cheese with sugar and vanilla extract until the mixture is smooth and creamy.
-
In another chilled bowl whip the heavy cream until stiff peaks form.
-
Gently fold the whipped cream into the cream cheese mixture until fully combined and light.
-
Spoon or pipe the cheesecake filling over the crust in each cup.
-
Refrigerate the cups for at least two hours or until the filling is set.
-
Top each cheesecake cup with fresh berries before serving.
Note
- Assemble these cups a day ahead for a quick dessert option.
- For added brightness stir in a teaspoon of lemon zest into the filling.
- Store leftover cups covered in the refrigerator for up to three days.
- Swap the berries for a dollop of chocolate ganache or fruit compote for variation.

