

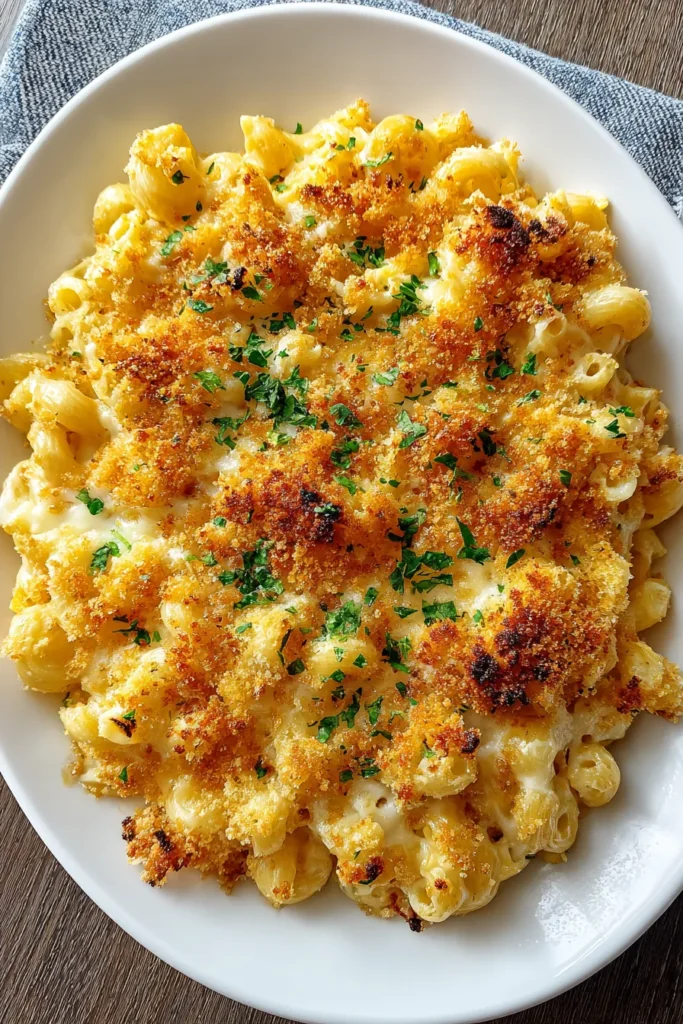
There’s something utterly satisfying about sliding a golden-bubbly casserole dish out of the oven, the edges of the pasta crisped to perfection and the center still luxuriously creamy. Baked mac and cheese isn’t just food—it’s a warm embrace on a plate, a reminder of all the best parts of home cooking. Each forkful delivers a melody of flavors, with sharp cheddar singing on the front line, mozzarella adding its stretchy harmonies, and Parmesan performing the final flourish. The panko topping, bronzed by melted butter, introduces a delightful crunch that balances the richness beneath. Whether you’re feeding a hungry family, sharing comfort with friends, or simply craving a solo indulgence, this dish exceeds expectations every time.
The beauty of this recipe lies not only in its flavor but also in its simplicity. You don’t need to be a seasoned chef to master its steps; even beginners can achieve restaurant-worthy results with confidence. And once you’ve mastered the basics, feel free to customize—toss in crispy bacon bits, fold in roasted veggies, or stir through a pinch of cayenne for a subtle kick. Trust me, I’ve lost count of how many variations I’ve experimented with in my own kitchen, and each version brings its own special magic. So grab your apron and your favorite baking dish; it’s time to create a classic that will become a cherished staple.
KEY INGREDIENTS IN BAKED MAC AND CHEESE
To build the creamiest, most comforting baked mac and cheese, each ingredient plays a starring role. From the pasta that holds everything together to the trio of cheeses that create the velvety sauce, here’s why each component deserves attention.
- Elbow Macaroni
This classic pasta shape has the perfect hollow crevices to catch and hold onto every bit of cheesy sauce, ensuring each bite is as flavorful as the last.
- Unsalted Butter
Melting into that flawless roux, butter provides essential fat and richness, creating the smooth base for your cheese sauce without altering the seasoning too much.
- All-Purpose Flour
When whisked into melted butter, flour thickens the liquid into a creamy sauce. This simple roux is the secret to consistency and body in your cheese mixture.
- Whole Milk
Full-fat milk adds lush creaminess and a gentle sweetness, balancing the sharpness of the cheeses while helping the sauce cling to each noodle.
- Sharp Cheddar Cheese
Bold and tangy, sharp cheddar brings the signature “mac and cheese” flavor and contributes to the sauce’s lush texture when melted.
- Mozzarella Cheese
Known for its incredible stretch, mozzarella blends smoothly into the sauce, making every bite gooey and luscious.
- Parmesan Cheese
Nutty and salty, Parmesan adds a depth of flavor and a hint of umami, both in the sauce and as part of the crunchy topping.
- Salt
Enhances all the other flavors and ensures your sauce is perfectly seasoned from start to finish.
- Black Pepper
Adds a warm, subtle spice that cuts through the richness of the cheeses.
- Smoked Paprika
Contributes a mild smoky undertone that elevates the overall flavor profile and pairs beautifully with the creamy sauce.
- Garlic Powder
Provides a subtle savory note that enhances depth without overpowering the cheese.
- Onion Powder
Brings a gentle sweetness and complexity, rounding out the seasoning.
- Panko Breadcrumbs
Light and airy, panko creates that irresistible, crunchy topping, offering texture contrast against the creamy pasta.
- Melted Butter for Topping
Coats the breadcrumbs to ensure they brown evenly and gain that perfect, golden hue.
- Fresh Parsley or Chives (Optional)
A fresh herbal garnish that brightens each bite and adds a pop of color when serving.
HOW TO MAKE BAKED MAC AND CHEESE
Ready to transform simple ingredients into a crowd-pleasing, creamy classic? Follow these steps carefully, and soon your kitchen will be filled with irresistible scents and a golden-brown casserole dish that’s begging to be devoured.
1. Preheat Your Oven to 350°F (175°C). Ensuring your oven reaches the right temperature before baking guarantees an even, golden crust without undercooking the center.
2. Cook the Pasta: Bring a large pot of salted water to a rolling boil. Add the elbow macaroni and cook until al dente, following package timing. Drain well and set aside—slightly undercooked pasta will soak up sauce without turning mushy.
3. Make the Roux: In a large saucepan over medium heat, melt the unsalted butter. Whisk in the all-purpose flour and cook for about one minute, stirring constantly to form a smooth roux without any raw flour taste.
4. Incorporate the Milk: Gradually pour in the whole milk while whisking vigorously to prevent lumps. Bring the mixture to a gentle simmer, stirring occasionally until the sauce thickens, about 5–7 minutes.
5. Add the Cheeses: Remove the saucepan from heat and immediately stir in the shredded sharp cheddar, shredded mozzarella, and half of the grated Parmesan. Continue stirring until the cheeses are fully melted and the sauce is silky-smooth.
6. Season the Sauce: Sprinkle in the salt, black pepper, smoked paprika, garlic powder, and onion powder. Taste and adjust the seasoning as needed to achieve a balanced, flavorful base.
7. Combine Pasta and Sauce: Transfer the drained macaroni into a large mixing bowl. Pour the cheese sauce over the pasta and stir with a spatula until every piece is thoroughly coated.
8. Assemble in Baking Dish: Grease a 3-quart baking dish lightly with butter or cooking spray. Spoon the macaroni-and-cheese mixture into the dish, spreading it evenly.
9. Prepare the Topping: In a small bowl, combine the panko breadcrumbs with melted butter and the remaining Parmesan cheese. Toss gently to coat each crumb.
10. Add the Crust: Evenly sprinkle the breadcrumb mixture over the top of the macaroni and cheese, ensuring full coverage for maximum crunch.
11. Bake: Place the dish in the preheated oven and bake for 25–30 minutes, or until the topping is deep golden brown and the sauce bubbles around the edges.
12. Rest and Garnish: Remove the casserole from the oven and let it cool for about 10 minutes. Sprinkle with fresh parsley or chives if desired, slice into squares, and serve warm for ultimate comfort.
SERVING SUGGESTIONS FOR BAKED MAC AND CHEESE
When it comes to indulging in this rich, creamy baked mac and cheese, presentation and pairings can elevate the experience even further. Whether you’re hosting a casual get-together or simply treating yourself, these serving ideas will ensure every bite feels special and satisfying.
- Serve with a Crisp Green Salad: A light, crisp salad dressed with lemon vinaigrette cuts through the richness, balancing the palate and adding a refreshing contrast. Toss together mixed greens, cucumber ribbons, and cherry tomatoes for bright color and texture.
- Pair with Roasted Vegetables: Oven-roasted broccoli, Brussels sprouts, or asparagus provide a savory, slightly charred side that pairs beautifully with creamy pasta. Season veggies with olive oil, salt, and pepper, and roast at 400°F until tender and golden.
- Top with Crispy Bacon or Prosciutto: Sprinkle crumbled crispy bacon or torn prosciutto shards over the warm mac and cheese for a salty, smoky flair that enhances the cheese flavors.
- Add a Tangy Slaw: A crunchy red cabbage slaw with apple cider vinegar, honey, and mustard offers both texture and a tangy kick that complements the cheesy base, making each mouthful more interesting.
HOW TO STORE BAKED MAC AND CHEESE
Ensuring your baked mac and cheese retains its creamy goodness and crisp topping for future meals is all about proper cooling, storing, and reheating. Follow these tips to keep every portion tasting freshly made and as delicious as the day you baked it.
- Refrigerator Storage: After letting the dish cool completely to room temperature, cover it tightly with plastic wrap or transfer individual portions to airtight containers. Store in the refrigerator for up to 4 days, ensuring minimal exposure to air to prevent drying out.
- Freezer Method: For longer storage, cool the mac and cheese fully, then portion into freezer-safe containers. Press a piece of parchment paper directly on the surface to protect the topping before sealing. Freeze for up to 2 months. Thaw overnight in the refrigerator before reheating.
- Reheating in the Oven: To revive that perfect crust, reheat at 350°F with the dish covered in foil for 15–20 minutes, then remove the foil for the last 5 minutes to brown the topping again. This method ensures the sauce heats evenly without drying.
- Quick Microwave Option: For single servings, place your portion in a microwave-safe bowl, sprinkle a few extra cheese shreds on top, and cover with a damp paper towel. Microwave in 1-minute intervals on medium power, stirring gently between each, until warmed through and gooey.
CONCLUSION
From the moment that golden, bubbling cheese first emerges from the oven, you’ll understand why baked mac and cheese holds a special place in so many hearts. This recipe brings together simple pantry staples—elbow macaroni, three types of cheese, and a buttery panko crust—for a result that’s greater than the sum of its parts. With just 15 minutes of prep, 45 minutes of baking, and a quick 10-minute rest, you’ll serve up a comforting dish that’s perfect for lunch or dinner, beginner-friendly and endlessly customizable. Whether you stick to the classic rendition or add bold variations like spicy cayenne or smoky bacon bits, this mac and cheese never fails to satisfy cravings and earn glowing compliments from friends and family alike.
Feel free to print this article and save it for later, or revisit it anytime you’re in need of a reliable, heartwarming meal. You can also find a FAQ below to answer any questions about ingredient swaps, cooking times, or storage. I’d love to hear about your experience: drop a comment if you give this recipe a try, ask any questions you have, or share your own creative twists. Your feedback helps me refine these recipes and ensures every home cook can achieve mac and cheese perfection. Happy baking and even happier eating—you’re one step away from cheesy, crunchy bliss!

Baked Mac and Cheese
Description
This baked mac and cheese features a gooey cheese sauce enveloping perfectly cooked pasta, topped with a crispy panko layer for that extra crunch. It's comfort food at its finest!
Ingredients
Instructions
-
Preheat your oven to 350°F (175°C).
-
Cook the pasta: Bring a large pot of salted water to a boil. Add the macaroni and cook until al dente, according to package instructions. Drain and set aside.
-
Make the cheese sauce: In a large saucepan over medium heat, melt 4 tablespoons of butter. Whisk in the flour and cook for about 1 minute to form a roux.
-
Gradually whisk in the milk, making sure there are no lumps, and bring the mixture to a gentle simmer. Cook until the sauce thickens, about 5-7 minutes.
-
Remove from heat and add the cheddar, mozzarella, and half of the Parmesan cheeses. Stir until the cheese is completely melted and the sauce is smooth.
-
Season the cheese sauce with salt, black pepper, smoked paprika, garlic powder, and onion powder. Adjust seasoning to taste.
-
Combine pasta with cheese sauce: In a large bowl, combine the cooked macaroni with the cheese sauce, stirring until well coated.
-
Transfer the macaroni and cheese mixture to a greased 3-quart baking dish.
-
Prepare breadcrumb topping: In a small bowl, mix the panko breadcrumbs with melted butter and the remaining Parmesan cheese.
-
Sprinkle the breadcrumb mixture evenly over the macaroni and cheese.
-
Bake in the preheated oven for 25-30 minutes, or until the top is golden brown and the cheese is bubbly.
-
Allow to cool slightly before serving with a sprinkle of fresh parsley or chives, if desired.
Note
- For a spicy kick, add a pinch of cayenne pepper to the cheese sauce.
- You can substitute other cheeses like Gruyère or Monterey Jack for a different flavor profile.
- To make a crispier topping, broil the dish for a few minutes at the end of baking, watching carefully to avoid burning.
- This dish can be prepared a day ahead; just refrigerate before baking and add 10 minutes to the bake time when ready to cook.

