

Every forkful of this Burnt Basque Cheesecake is like a gentle hug for your taste buds. It greets you with a dramatic, charred top that brings an almost caramelized crunch, giving way to a divinely creamy center that’s somewhere between a custard and a souffle. If you’ve ever been intimidated by cheesecake, let me reassure you: this Basque cheesecake is surprisingly forgiving. With just seven simple ingredients and an easy cheesecake recipe framework, you’ll be whipping up a decadent dessert that looks like it came from a fancy bakery. The beauty of this creamy dessert lies in its contrast—the rich flavor of browned sugar and cheese meets the ethereal softness of its underbelly, making every bite a dance of textures.
I remember the first time I tackled this recipe in my cozy kitchen, apron dusted with flour and windows steamed up from the oven heat. My heart raced as I slid that rustic pan of sweet batter into the preheated oven, hoping for the perfect balance of a deeply golden crust and a wiggly, custard-like core. Preparation took just about 20 minutes of active effort, followed by 30 minutes in the oven and a patient rest of five hours (overnight is best!). It’s an intermediate-level project, but trust me, the payoff is enormous: 12 generous slices, roughly 460 calories each, of pure bliss. And once you taste that first morsel, you’ll be hooked on Basque cheesecake forever.
KEY INGREDIENTS IN BURNT BASQUE CHEESECAKE
Before diving into the process, let’s chat about the stars of this show. Each ingredient plays a crucial role in creating that signature silky interior and bold, caramelized exterior. Understanding their function will help you nail this recipe every time.
- Cream Cheese
The heart and soul of your cheesecake, cream cheese provides the rich, tangy base that becomes impossibly smooth when whipped. Using room temperature cream cheese ensures a lump-free, velvety texture.
- Granulated Sugar
Sugar not only sweetens but also contributes to the Maillard reaction on the surface, giving that iconic burnt crust its deep amber color and slightly toasty flavor.
- Eggs
Eggs bind everything together and lend structure, transforming the batter into a custardy marvel. Adding them one at a time encourages even incorporation and prevents over-beating.
- Vanilla Extract
A splash of vanilla warms the palate and enhances the cheesecake’s natural creaminess without overpowering the other flavors.
- Heavy Cream
Heavy cream lightens the batter and makes the final texture lusciously creamy. When folded in gently, it ensures the cheesecake remains delicately airy.
- All-Purpose Flour
A small amount of flour stabilizes the custard, helps set the edges, and prevents cracks by giving the batter a bit more body.
- Salt
Just a pinch of salt heightens all the sweet and creamy notes, rounding out the flavors for maximum depth and balance.
HOW TO MAKE BURNT BASQUE CHEESECAKE
Crafting this cheesecake is an adventure in contrasts: high heat for a rustic top, slow cooling for unblemished creaminess. Let’s get into the steps with plenty of detail so you know exactly what to expect.
1. Preheat your oven to 400°F (200°C). Line a 9-inch (23 cm) springform pan with tall parchment paper, extending at least 2 inches above the rim. This extra height keeps the batter contained as it puffs and browns.
2. In a large bowl, use an electric mixer on medium speed to beat the room-temperature cream cheese until it’s perfectly smooth and creamy, about 2–3 minutes. Scrape down the sides to ensure no stray lumps remain.
3. With the mixer on low speed, gradually add the granulated sugar. Once incorporated, increase to medium speed and beat for 1–2 more minutes until the mixture is light, airy, and free of clumps.
4. Crack in the eggs one at a time, mixing each addition thoroughly on medium speed. After each egg, scrape the bowl’s sides to maintain an even, silky batter.
5. Add the vanilla extract and mix just until it disappears into the cream cheese base, infusing it with gentle aromatic warmth.
6. Turn the mixer to low, pour in the heavy cream slowly, and combine until the batter is smooth. Be mindful not to over-mix; you want to keep the air you’ve already whipped in.
7. Sift the flour and salt directly into the bowl. Fold the batter with a spatula until no streaks of flour remain, taking care not to overwork the mixture.
8. Transfer the batter into your prepared springform pan, smoothing the top so it bakes evenly across.
9. Bake for 25–30 minutes, or until the top achieves a deep golden brown and the edges look set, but the center still jiggles like a whisper of custard.
10. Turn off the oven and leave the cheesecake inside with the door closed for another hour. This slow cooling helps prevent cracks and keeps the interior ultra-creamy.
11. Remove the pan from the oven and let it sit at room temperature until it’s no longer warm. Then, refrigerate for at least 4 hours—or, better yet, overnight—to deepen the flavors.
12. To serve, carefully release the springform, peel away the parchment, slice with a sharp knife, and transfer each piece to a plate. Get ready for gasps of delight!
SERVING SUGGESTIONS FOR BURNT BASQUE CHEESECAKE
Once your cheesecake has rested to perfection, it’s time to think about how best to present and savor those tender, custardy slices. The beauty of Burnt Basque Cheesecake is its versatility—it shines on its own but also plays wonderfully with complementary flavors and textures. Whether you’re hosting a dinner party or treating yourself to a cozy afternoon snack, these serving ideas will elevate every mouthful.
- Fresh Berries and Mint
Top each slice with a handful of bright mixed berries—strawberries, raspberries, or blueberries—and a sprig of fresh mint. The tart fruit cuts through the richness and adds a splash of color.
- Whipped Cream Swirl
Pipe or spoon a dollop of lightly sweetened whipped cream alongside the cheesecake. The airy softness contrasts beautifully with the custardy center and deep brown crust.
- Citrus Zest Lining
For an aromatic twist, sprinkle finely grated lemon or orange zest over the top just before serving. The bright citrus oils lift the dense, creamy flavors and add a refreshing note.
- Caramel Drizzle
Warm a bit of homemade or store-bought caramel sauce and elegantly drizzle it over the edges. The sticky sweetness pairs perfectly with the cheese’s tang and toasty crust.
HOW TO STORE BURNT BASQUE CHEESECAKE
Proper storage is key to preserving that silky interior and preventing the top from absorbing unwanted odors. With just a few simple steps, you can keep your cheesecake tasting as fresh as the day you baked it. Always store chilled and handle gently to maintain its signature texture.
- Wrap in Plastic or Parchment
Once fully cooled, cover the cheesecake (still in the springform pan) with a layer of plastic wrap or neatly wrap the cake on its platter using parchment paper. This shields it from dry air and helps lock in moisture.
- Airtight Container
If you’ve sliced it, place individual pieces in an airtight container. Separate layers with small squares of parchment to prevent sticking, and refrigerate promptly.
- Refrigerator Storage
Store in the back of the fridge (where temperatures stay most consistent) for up to 5 days. The flavor continues to mellow and deepen, making each slice even more gratifying.
- Freezing for Longevity
For longer storage, freeze the whole cheesecake or individual slices. Flash-freeze on a tray, then transfer to a freezer-safe bag or container. Thaw overnight in the refrigerator before serving.
CONCLUSION
Every step of making this Burnt Basque Cheesecake—from whipping the velvety cream cheese to waiting for its dramatic golden crown—feels like a cozy adventure that rewards you with a truly decadent dessert. We’ve covered all the essentials: a short ingredient list, clear instructions, and expert tips on serving, storing, and savoring every bite. You’ve learned why each component—from the granulated sugar browning into caramel notes to the gentle folding of heavy cream—plays its part in creating that unforgettable contrast of a charred top and a luscious, custard-like interior.
Feel free to print this article and save it in your recipe binder or kitchen drawer for future inspiration. You can also find a FAQ below to answer any lingering questions you might have about techniques, ingredient swaps, or troubleshooting. If you give this Basque cheesecake a try, I’d love to hear how it went! Leave a comment with your tweaks, questions, or epic kitchen stories. Your feedback makes this community of home cooks even richer and more supportive—so let me know if you need help, have ideas to share, or simply want to gush over that perfect first bite. Happy baking!
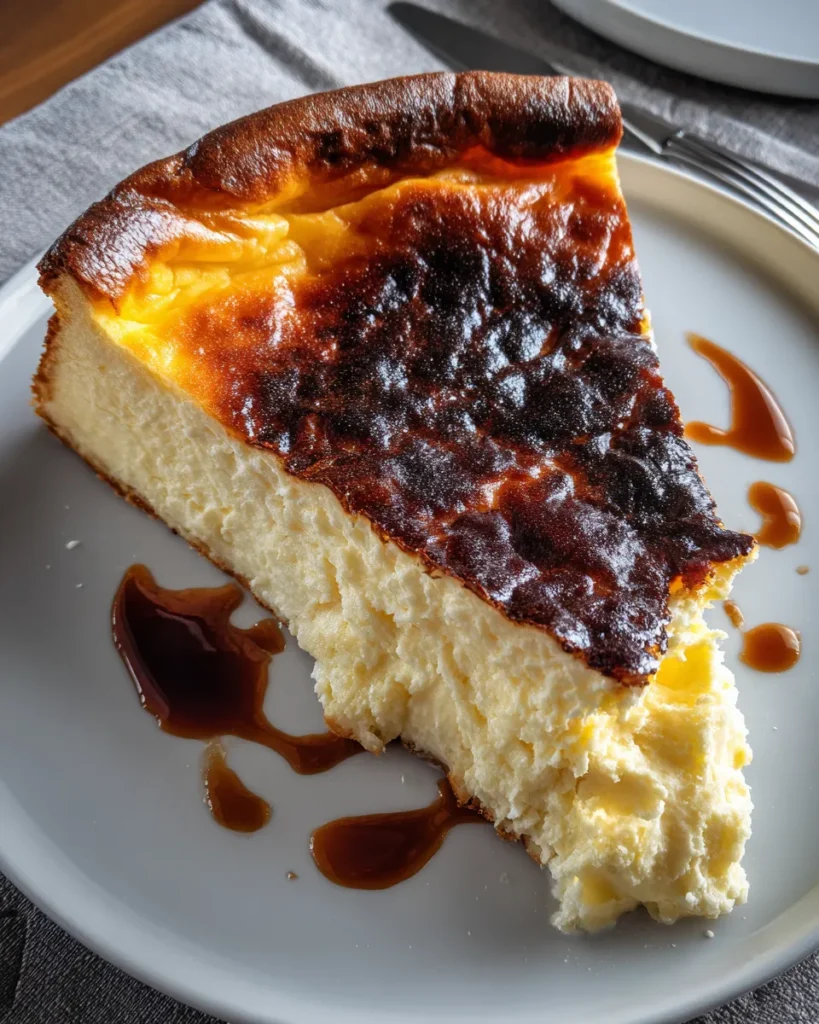

Burnt Basque Cheesecake
Description
This Basque cheesecake features a beautifully charred top that delivers a rich, caramelized flavor while the interior remains silky-smooth and custardy. A true treat for all cheesecake lovers!
Ingredients
Instructions
-
Preheat your oven to 400°F (200°C). Prepare a 9-inch (23 cm) springform pan by lining it with parchment paper, ensuring that the paper extends above the sides of the pan. This will help the cheesecake maintain its shape and facilitate easy removal.
-
In a large mixing bowl, beat the cream cheese with an electric mixer on medium speed until it is smooth and creamy, about 2-3 minutes. Scrape down the sides of the bowl as needed to ensure all the cream cheese is fully incorporated.
-
Gradually add the granulated sugar, mixing on low speed until well combined. Increase the speed to medium and beat for an additional 1-2 minutes until the mixture is fluffy and free of lumps.
-
Add the eggs, one at a time, mixing thoroughly after each addition. Make sure to scrape down the sides of the bowl to ensure all ingredients are well combined.
-
Pour in the vanilla extract and mix until fully incorporated.
-
With the mixer on low speed, gradually add the heavy cream. Mix until just combined; be careful not to over-mix to maintain the cheesecake's light texture.
-
Sift the all-purpose flour and salt directly into the batter. Gently fold the flour into the mixture using a spatula until just combined, ensuring there are no lumps but being careful not to over-work the batter.
-
Pour the cheesecake batter into the prepared springform pan, making sure it is evenly distributed.
-
Bake in the preheated oven for 25-30 minutes or until the top is deeply golden brown and the edges are set but the center still jiggles slightly when gently shaken.
-
Once baked, turn off the oven and leave the cheesecake inside for another hour to cool gradually. This will help prevent cracking.
-
After an hour, remove the cheesecake from the oven and let it cool to room temperature. Once cooled, refrigerate for at least 4 hours, preferably overnight, to allow the flavors to develop.
-
Carefully remove the cheesecake from the springform pan, peel off the parchment paper, slice, and serve.
Note
- Use room temperature ingredients for a smoother batter.
- Experiment with flavors by adding citrus zest or a splash of liqueur.
- This cheesecake is meant to be creamy and somewhat custard-like in the center; don't worry if it jiggles!
- It can be served plain or with fresh fruits or whipped cream for added texture and flavor.

