

There’s something magical about those first moments when a tray of freshly baked cookies emerges from the oven and fills the kitchen with warmth. These Decadent Melt-in-Your-Mouth Snowball Cookies with Nutty Powdered Sugar Dusting take that magic to a whole new level. Soft, buttery centers studded with finely chopped nuts offer the perfect contrast: a delicate crunch meets a tender crumb that practically dissolves on your tongue. Coated twice in a snowy blanket of powdered sugar, each cookie looks like a little winter treasure that beckons you to take just one more bite. Whether you’re a seasoned baker or a beginner eager to try your hand at something special, these festive treats promise to brighten your baking day.
Beyond their irresistible texture and appearance, these cookies are wonderfully straightforward, making them an ideal project for holiday get-togethers, casual tea time, or a sweet pick-me-up on a chilly afternoon. With just eight simple ingredients—everyday pantry staples like unsalted butter, granulated sugar, and all-purpose flour—plus your choice of nuts for that signature nutty note, you’ll whip up about two dozen melt-in-your-mouth delights in no time. Preparation takes only 20 minutes, baking adds another 15, and a quick rest before the final sugar roll ensures each cookie reaches its full snowy potential. At roughly 120 calories each, they’re a sweet indulgence you can feel good about sharing (and maybe sneaking a few extras!). Crack on, sprinkle generously, and watch everyone’s faces light up when that first melt-in-your-mouth moment arrives.
KEY INGREDIENTS IN DECADENT MELT-IN-YOUR-MOUTH SNOWBALL COOKIES WITH NUTTY POWDERED SUGAR DUSTING
Every superstar recipe relies on quality components, and these snowball cookies are no exception. From the rich buttery base to the final sugary coat, each ingredient plays a crucial role in creating that signature melt-in-your-mouth texture and delicate nutty flavor.
- Unsalted butter
Brings rich creaminess and buttery depth, ensuring the cookies hold their shape while delivering a tender crumb that practically dissolves.
- Granulated sugar
Adds sweetness and helps with aeration during creaming, giving the dough its light, fluffy structure before baking.
- Vanilla extract
Infuses warm, fragrant notes that elevate every bite and complement the nutty undertones, rounding out the overall flavor profile.
- All-purpose flour
Provides structure and the necessary framework to support the buttery dough without weighing it down.
- Salt
Balances sweetness and enhances the natural flavors of butter and nuts, creating a more complex and satisfying taste.
- Finely chopped nuts
Introduce a delightful crunch and earthy richness; walnuts or pecans work beautifully, but feel free to experiment with almonds or hazelnuts.
- Powdered sugar
Delivers a light, snowy coating straight from the oven, locking in moisture and creating that iconic melt-in-your-mouth moment.
- Extra powdered sugar
Used for a second roll, it gives a pristine finish that’s perfect for gifting, displaying, or simply indulging in their sweet, snowy glory.
HOW TO MAKE DECADENT MELT-IN-YOUR-MOUTH SNOWBALL COOKIES WITH NUTTY POWDERED SUGAR DUSTING
Baking these snowball cookies is like following a cozy roadmap where each turn adds a fresh layer of flavor and texture. From preheating the oven to that final dusting of sugar, here’s how to bring this sweet recipe to life step by step.
1. Preheat your oven to 350°F (175°C) and line a baking sheet with parchment paper to prevent sticking and ensure even browning.
2. In a large mixing bowl, using a hand mixer or stand mixer, cream together the softened butter and granulated sugar for about 3–4 minutes until the mixture is light, airy, and pale yellow in color.
3. Add the vanilla extract to the creamed butter and sugar, then mix on low speed just until the flavor is evenly distributed throughout the dough.
4. In a separate bowl, use a whisk to combine the all-purpose flour, salt, and finely chopped nuts until all dry ingredients are evenly mixed.
5. Gradually add the flour mixture to the butter-sugar mixture, blending on low speed to avoid overworking the dough. Mix only until it just comes together—overmixing can lead to tough cookies.
6. With clean hands, shape the dough into small balls, about 1 inch in diameter. Place each ball on the prepared baking sheet, leaving about 1½ inches of space between them for gentle spreading.
7. Bake in the preheated oven for 12–15 minutes, or until the bottoms turn a light golden hue while the tops remain pale and tender.
8. Remove the cookies from the oven and let them cool on the baking sheet for about 5 minutes. This rest period helps them firm up just enough to handle.
9. While still warm, roll each cookie in powdered sugar until fully coated, then return them to the wire rack so excess sugar can fall away.
10. After the cookies have cooled completely, give them a second roll in powdered sugar for a gorgeous, snowy finish that seals in all that buttery, nutty goodness.
SERVING SUGGESTIONS FOR DECADENT MELT-IN-YOUR-MOUTH SNOWBALL COOKIES WITH NUTTY POWDERED SUGAR DUSTING
When it comes to serving these melt-in-your-mouth snowball cookies, presentation is part of the fun—and sharing them can turn any gathering into a festive celebration. Whether you’re hosting a holiday party, enjoying a cozy afternoon tea, or simply surprising friends with a sweet treat, the right pairing and display will highlight their soft, buttery centers and delicate nutty dusting. With their snowy appearance and irresistible crumb, these cookies are perfect for creating picture-worthy platters or charming gift boxes. Here are some inspired ways to serve them that will have everyone reaching for seconds!
- Festive Platter Arrangement
Arrange cookies in concentric circles on a large, flat platter, alternating dusted and extra-dusted pieces for visual interest. Add sprigs of fresh rosemary or holly berries around the edges for a wintery touch.
- Elegant Tea-Time Pairing
Serve cookies alongside a pot of hot herbal tea or a rich chai latte. The gentle sweetness pairs beautifully with warm spices, making each bite feel like a cozy embrace.
- Gift-Ready Cookie Tins
Layer cookies in a decorative tin, placing parchment paper between layers to preserve that fresh-baked crunch. Tie the tin with a festive ribbon and a handwritten gift tag for a personal touch.
- Dessert Trio Platter
Combine these snowball cookies with chocolate truffles and mini fruit tarts on a tiered dessert stand. The contrast in textures and flavors creates an indulgent dessert spread that’s sure to wow guests.
HOW TO STORE DECADENT MELT-IN-YOUR-MOUTH SNOWBALL COOKIES WITH NUTTY POWDERED SUGAR DUSTING
Proper storage is key to preserving the tender, melt-in-your-mouth quality of snowball cookies. Since these treats rely on a delicate balance of moisture and sugar, keeping them in the right environment will maintain their soft centers and snowy exteriors. Whether you’re saving extras for later in the week or preparing gift jars in advance, following a few simple guidelines ensures they stay fresh, flavorful, and ready to enjoy.
- Airtight Container at Room Temperature
Store cooled cookies in a single layer inside a sealed container to prevent them from drying out. Keep them away from direct sunlight and heat sources for up to one week.
- Layering with Parchment Paper
If stacking cookies, place a sheet of parchment paper between layers to prevent them from sticking together and preserving their snowy coating.
- Refrigerator for Extended Freshness
For longer storage (up to two weeks), place cookies in an airtight container and refrigerate. Allow them to come to room temperature before serving to recover that melt-in-your-mouth texture.
- Freeze for Long-Term Storage
Arrange cookies in a single layer on a baking sheet and freeze until solid. Transfer to a freezer-safe bag or container, separating layers with parchment paper. Thaw at room temperature and lightly dust with extra powdered sugar before serving.
CONCLUSION
From the very first buttery bite to that final dusting of nutty powdered sugar, these Decadent Melt-in-Your-Mouth Snowball Cookies with Nutty Powdered Sugar Dusting bring a blend of simplicity and celebration to your baking repertoire. We’ve covered everything you need: from the best ingredients and step-by-step instructions to creative serving ideas and foolproof storage tips. Whether you’re a beginner looking to impress at your first holiday gathering or a seasoned home cook eager to add a new favorite to your dessert lineup, this recipe welcomes you to a festive world of sweet, snowy delights. Feel free to print out this article, save it in your recipe binder, or pin it on your kitchen board for easy reference whenever the mood for something special strikes.
You’ll also find a handy FAQ section below to troubleshoot common questions or offer substitutions, but we’d love to hear from you directly. If you whip up a batch of these heavenly snowballs, share your experience, ask questions, or leave feedback in the comments. Did you try a different nut, add a pinch of cinnamon, or serve them with a unique pairing? Let us know how it turned out, and we’ll be here to chat, troubleshoot, and celebrate every melt-in-your-mouth cookie moment with you!
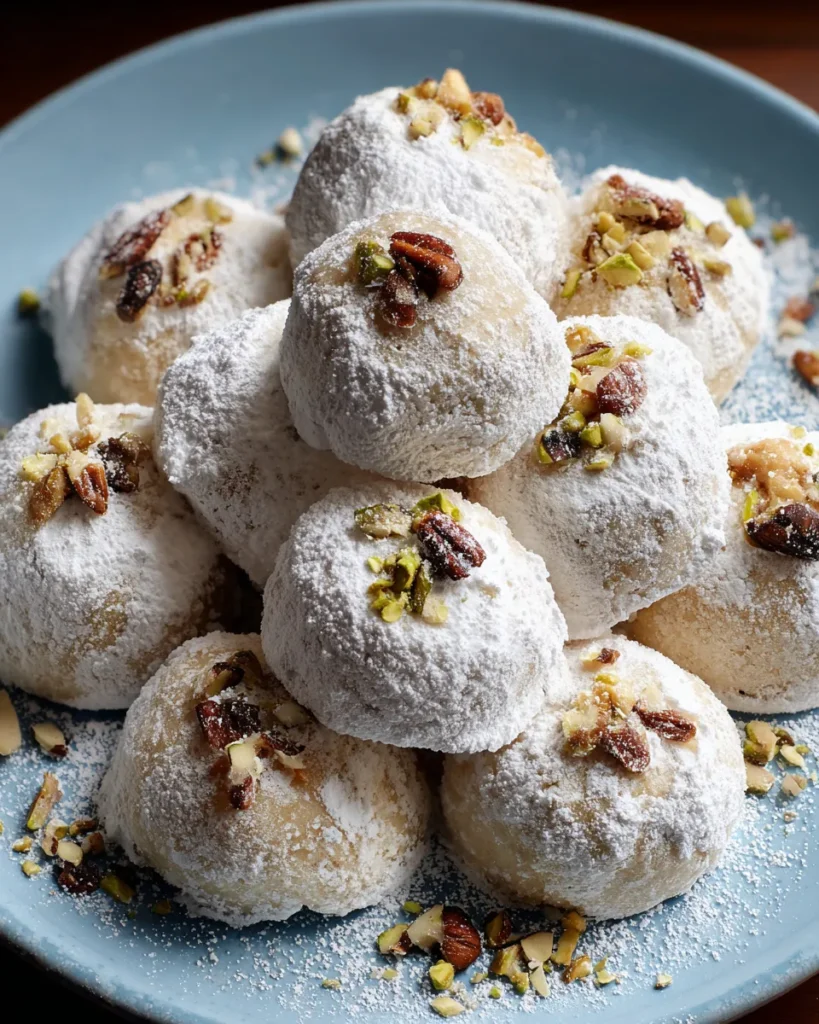

Decadent Melt-in-Your-Mouth Snowball Cookies with Nutty Powdered Sugar Dusting
Description
These melt-in-your-mouth snowball cookies are a delightful blend of rich butter and finely chopped nuts, crowned with a snowy layer of powdered sugar for an irresistible treat.
Ingredients
Instructions
-
Preheat your oven to 350°F (175°C) and line a baking sheet with parchment paper to prevent sticking.
-
In a large mixing bowl, cream together the softened butter and granulated sugar using a hand mixer or stand mixer until the mixture is light and fluffy, which should take about 3-4 minutes.
-
Add the vanilla extract to the creamed mixture and mix until well combined.
-
In a separate bowl, whisk together the all-purpose flour, salt, and finely chopped nuts until evenly mixed.
-
Gradually add the flour mixture to the butter mixture, blending thoroughly on low speed. Be careful not to overmix; just combine until the dough comes together.
-
Using your hands, shape the dough into small balls, about 1 inch in diameter, and place them on the prepared baking sheet, leaving some space between each cookie.
-
Bake in the preheated oven for about 12-15 minutes or until the bottoms are lightly golden, but the tops should remain pale.
-
Once done, remove the cookies from the oven and allow them to cool on the baking sheet for about 5 minutes before transferring them to a wire rack to cool completely.
-
While the cookies are still warm, roll them in powdered sugar until they are well coated. Place them back on the wire rack to let any excess sugar fall off.
-
Allow the cookies to cool completely before giving them a second roll in powdered sugar for a beautiful, snowy finish.
Note
- These cookies are perfect for holiday gatherings or as a sweet treat throughout the year.
- You can customize the nuts used for a different flavor or texture; try almonds or hazelnuts for a unique twist.
- Store the cookies in an airtight container at room temperature for up to one week, though they may not last that long!
- For an extra touch, consider adding a pinch of cinnamon or nutmeg to the dough for a warm, spiced flavor profile.

