

Let’s dive into a world where dessert meets breakfast in the most playful way possible! These Fruity Pebbles Cheesecake Tacos are like a carnival of color and flavor dancing on your plate. You get the buttery crunch of a freshly fried tortilla shell, coated with vibrant, fruity cereal that snaps under your teeth. Then, nestled inside each shell is a heavenly cheesecake filling that’s smooth, creamy, and just sweet enough to make your taste buds sing. From the very first bite, you’ll notice how the crunchy exterior plays so well against the light, mousse-like center. Whether you’re looking to impress guests at a weekend brunch or simply want to treat yourself to a fun snack, these tacos deliver on both taste and presentation.
Every element of this recipe has been carefully chosen to create a balanced dessert that’s as easy to assemble as it is delightful to devour. We’re talking about a beginner-friendly project that takes just 20 minutes to prepare, 10 minutes to cook, and needs a brief 30-minute rest in the fridge to set up perfectly. With roughly 350 calories per taco, these are an indulgence you can feel good about sharing—especially if you add fresh berries or a sprinkle of rainbow sprinkles for that extra pop of color. Ready to whip up something that will make everyone at the table smile? Let’s gather our ingredients and get cooking!
KEY INGREDIENTS IN FRUITY PEBBLES CHEESECAKE TACOS
Before we start cooking, let’s meet the stars of our recipe. Each ingredient brings its own personality, working in harmony to create a dessert that’s as playful as it is delicious.
- Fruity Pebbles cereal
This colorful cereal acts as the crispy coating for our taco shells, adding a burst of fruity flavor and a satisfying crunch that contrasts beautifully with the creamy filling.
- Cream cheese
Softened to perfection, the cream cheese is the base of our cheesecake filling. Its rich, tangy profile provides stability and a classic cheesecake taste.
- Powdered sugar
Finely milled sugar that dissolves easily, sweetening the cheesecake mixture without any gritty texture and helping to achieve a silky-smooth consistency.
- Vanilla extract
A touch of vanilla adds warmth and depth, rounding out the sweetness and bringing a familiar aroma to the cheesecake filling.
- Flour tortillas
Small and pliable, these tortillas fry up into golden taco shells that hold their shape and deliver a neutral, slightly bready backdrop for the cereal coating.
- Vegetable oil
A high smoke-point oil used for frying, ensuring our taco shells become crisp and golden without burning or tasting greasy.
- Heavy whipping cream
Whipped into the cheesecake mixture, this cream lightens the texture and gives the filling a mousse-like quality that practically melts in your mouth.
- Rainbow sprinkles
An optional garnish that adds an extra dash of color and whimsy on top of each filled taco.
- Fresh berries or fruit
Another optional garnish, offering a fresh, juicy contrast to the sweet cheesecake and crunchy shell.
HOW TO MAKE FRUITY PEBBLES CHEESECAKE TACOS
Get ready to follow a series of straightforward steps that guide you from mixing to frying to filling. Each stage is designed to be beginner-friendly yet produce stunning results.
1. Prepare the Cheesecake Filling: In a medium mixing bowl, combine the softened cream cheese, powdered sugar, and vanilla extract. Use a hand mixer or whisk to blend everything until completely smooth. Gradually pour in the heavy whipping cream, continuing to mix until the mixture achieves a light, mousse-like consistency. Transfer the filling to the refrigerator to chill and firm up.
2. Form the Tacos: Lay your small flour tortillas on a clean surface. With a round cookie cutter or a sharp knife, cut each tortilla into circles about 3–4 inches in diameter. These neat rounds will serve as the base for our taco shells.
3. Fry the Taco Shells: Pour vegetable oil into a deep pan and heat to 350°F (175°C). Using tongs, carefully pick up each tortilla circle and gently fold it into a taco shape before lowering it into the hot oil. Fry for 1 to 2 minutes, flipping halfway through, until the shell is golden brown and crisp. Remove the shells and let them drain on a paper-towel–lined plate.
4. Coat with Fruity Pebbles: While the taco shells are still warm, press the outer surface into a shallow plate filled with Fruity Pebbles cereal. The warmth of the shell helps the cereal adhere evenly, creating a colorful, crunchy crust.
5. Assemble the Tacos: Spoon or pipe the chilled cheesecake filling into each cereal-coated shell. Fill generously but carefully to avoid overstuffing, ensuring each taco has a balanced ratio of shell to filling.
6. Garnish and Serve: Finish with a sprinkle of rainbow sprinkles for extra shimmer and, if you like, top with fresh berries or fruit slices. Serve immediately to preserve that signature crunch.
SERVING SUGGESTIONS FOR FRUITY PEBBLES CHEESECAKE TACOS
Once your Fruity Pebbles Cheesecake Tacos are assembled, you’ll want to serve them in ways that showcase both their color and texture. Here are four fun ideas to inspire your presentation and elevate the experience.
- Serve on a white platter arranged in a neat row to make the rainbow coating pop and create a modern, gallery-style display. This minimalist backdrop really emphasizes the vivid hues of the cereal and sprinkles.
- Pair with a fruit compote drizzled alongside. A lightly sweetened strawberry or blueberry compote adds a warm, syrupy contrast that ties into the fruity theme and complements the cool cheesecake.
- Offer a dipping station featuring small bowls of melted chocolate, caramel sauce, and whipped cream. Guests can customize each taco with extra drizzles, making the experience interactive and playful.
- Plate with a sprig of fresh mint and a dusting of powdered sugar for a touch of elegance. The mint’s bright green leaves add freshness and aroma, creating a sophisticated finish for these whimsical tacos.
HOW TO STORE FRUITY PEBBLES CHEESECAKE TACOS
If you’re not devouring these tacos immediately, proper storage will help maintain both their crunch and creamy texture. Here are a few methods to keep them tasting as fresh as possible.
- Store shells separately from the filling: Place cooled, cereal-coated shells in an airtight container at room temperature for up to one day. Keep the cheesecake filling chilled in a sealed jar or bowl to prevent moisture transfer.
- Assemble just before serving: For the crispiest texture, consider prepping shells and filling in advance but putting them together right before your event. This avoids any sogginess that can occur if they sit filled too long.
- Refrigerate filled tacos for short-term storage: If you must store fully assembled tacos, wrap them individually in plastic wrap and refrigerate for up to 24 hours. Note that the cereal coating may soften slightly over time.
- Freeze cheesecake filling: The mousse-like filling can be frozen in a freezer-safe container for up to one month. Thaw overnight in the refrigerator, then whisk briefly before piping back into freshly fried shells.
CONCLUSION
Every step of making these Sweet & Crunchy Fruity Pebbles Cheesecake Tacos has been designed to highlight both fun and flavor—from slicing tortillas into perfect rounds to the sensory delight of pressing colorful cereal onto warm shells. We’ve walked through key ingredients, explained how each one contributes to the final masterpiece, and provided detailed, easy-to-follow instructions. Along the way, you’ve learned serving suggestions that turn a simple snack into a celebratory spread, plus storage tips to keep your dessert tacos at peak freshness. Whether you’re hosting a birthday bash, a brunch with friends, or simply indulging in a weekend treat, this recipe stands out as a playful twist on classic cheesecake and taco formats.
Feel free to print this article or save it for later reference whenever you want to whip up a batch of these beginner-friendly dessert tacos. A handy FAQ section is provided below for any extra tips or troubleshooting you might need. And of course, I’d love to hear from you—if you try this recipe, leave a comment with your favorite garnish combo, ask questions about any step, or share feedback on how these tacos turned out for you. Your experience helps this community of home cooks learn and grow together, so don’t be shy! Enjoy every crunchy, creamy bite.
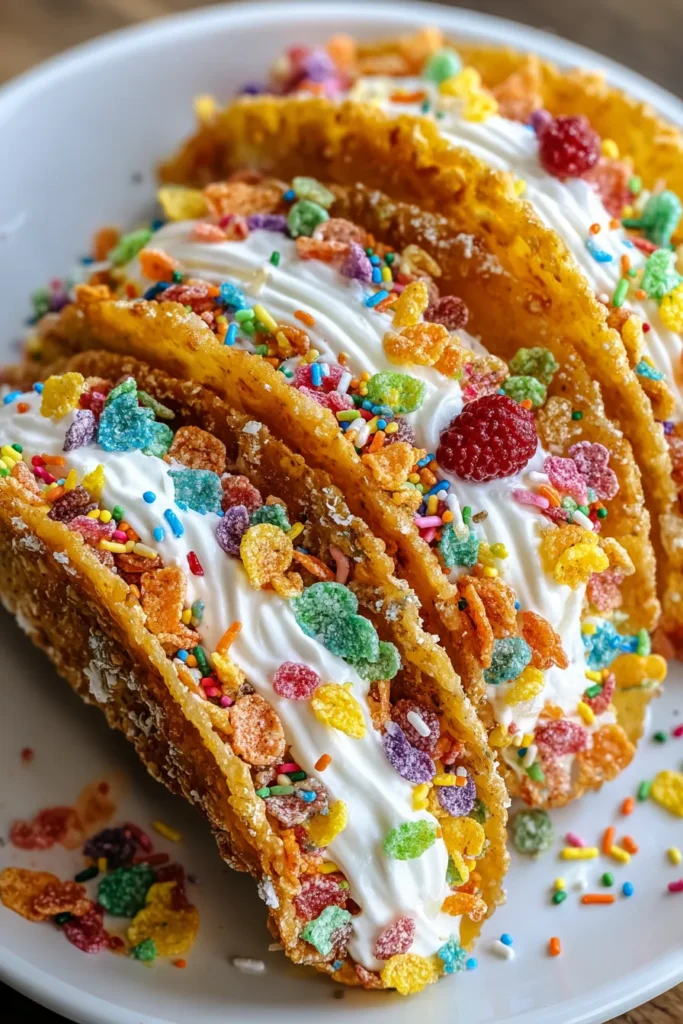

Fruity Pebbles Cheesecake Tacos
Description
These delightful Fruity Pebbles Cheesecake Tacos combine creamy cheesecake and a crispy cereal shell for a fun twist on dessert. Perfect for all ages!
Ingredients
Instructions
-
Prepare the Cheesecake Filling: In a medium mixing bowl, combine the softened cream cheese, powdered sugar, and vanilla extract. Mix until smooth. Gradually add the heavy whipping cream, continuing to mix until the filling is creamy and has a mousse-like consistency. Set aside in the refrigerator.
-
Form the Tacos: Use a round cookie cutter or a sharp knife to cut the small flour tortillas into circles, approximately 3-4 inches in diameter. These will serve as your taco shells.
-
Fry the Taco Shells: Heat the vegetable oil in a deep pan to 350°F (175°C). Carefully place each tortilla circle into the oil, using tongs to shape them into taco shells by folding them gently. Fry until golden brown and crisp, about 1 to 2 minutes. Remove from the oil and drain on a plate lined with paper towels.
-
Coat with Fruity Pebbles: While the taco shells are still warm, gently press them into a plate filled with Fruity Pebbles cereal, ensuring that the cereal adheres to the outside of the shells.
-
Assemble the Tacos: Fill each cereal-coated taco shell with the cheesecake mixture, using a piping bag or spoon. Fill generously but not so much that the filling spills over the sides.
-
Garnish and Serve: Optionally, sprinkle rainbow sprinkles over the cheesecake filling for an extra burst of color. Add fresh berries or fruit on top, if desired, for added flavor and visual appeal.
Note
- Ensure that the oil maintains the correct temperature; too hot will burn the shells, too cool will make them greasy.
- For a more vibrant presentation, use different types of Fruity Pebbles or mixed cereals.
- These tacos are best enjoyed immediately, as the filling may cause the cereal coating to become soggy over time.
- Adding a sprinkle of grated zesty citrus peel can enhance the fruity flavors.
- For a twist, try using different flavored cereals as the coating.

