

If you’re on the hunt for that perfect mashup of ooey-gooey cheese and hearty burrito goodness, this Grilled Cheese Burrito is your new go-to comfort food. Wrap up comfort food cravings with a cheesy twist on a classic burrito! Layers of melty cheddar and mozzarella collide with savory seasoned meat (or tender chicken) and fluffy rice, all enveloped in a toasty flour tortilla. Every bite delivers a symphony of flavors: the zing of pico de gallo or salsa, the creamy tang of sour cream, and the velvety richness of nacho cheese sauce. Whether it’s a quick lunch, a cozy dinner, or a game-day snack, this fusion dish is a guaranteed crowd-pleaser that transforms simple ingredients into something spectacular.
What makes this recipe extra inviting is its beginner-friendly nature and lightning-fast prep time. In just 15 minutes of preparation, followed by a mere 6 minutes of grilling and a 5-minute rest, you’ll have a golden-brown, flavor-packed burrito in hand. At around 650 calories, it strikes a satisfying balance between indulgence and simplicity. With a basic skillet and a handful of pantry staples, you’ll experience layers of melty cheese, savory meat, and zesty toppings all enveloped in a toasty tortilla. It’s a delightful fusion that hits every flavor note!
KEY INGREDIENTS IN GRILLED CHEESE BURRITO
Before we dive into the cooking process, let’s explore the hero ingredients that make this Grilled Cheese Burrito so irresistible. Each component plays a unique role in delivering that perfect combination of creaminess, crunch, and savory satisfaction.
- Flour tortilla
A soft, pliable wrap that holds all the fillings together. Its neutral taste and large size make it ideal for layering ingredients without tearing, ensuring every bite is neatly packed.
- Shredded cheddar cheese
Sharp and tangy, cheddar adds a robust flavor contrast. When heated, it melts beautifully, creating pockets of cheesy goodness that bind the ingredients and add richness.
- Shredded mozzarella cheese
Smooth and stretchy, mozzarella brings a creamy, milky texture. It blends seamlessly with cheddar to achieve that classic grilled cheese pull while mellowing out sharper notes.
- Seasoned ground beef or shredded chicken
Provides protein and hearty substance. The seasoning adds depth—think smoky, savory spices—so every mouthful bursts with meaty flavor.
- Cooked rice
Fluffy and filling, rice adds bulk and soaks up sauces. It creates a nice contrast in texture and makes the burrito more substantial.
- Pico de gallo or salsa
A fresh, acidic element that brightens the flavors. The mix of tomatoes, onions, cilantro, and chilies cuts through the richness for balance.
- Sour cream
Cool and tangy, sour cream offers a smooth creaminess. It tempers heat from jalapeños or salsa and unifies the layers.
- Nacho cheese sauce
A decadent, velvety drizzle that amplifies cheesiness. It adds a luxurious coating that clings to every filling.
- Butter or cooking spray
Used to crisp the tortilla to a golden brown. Butter introduces a subtle richness and helps achieve that irresistible crunch.
- Optional fillings (jalapeños, black beans, chopped onions, guacamole)
Customize your burrito with extra texture and flavor. Jalapeños add heat, beans bring fiber and creaminess, onions contribute sharpness, and guacamole delivers a silky, avocado twist.
HOW TO MAKE GRILLED CHEESE BURRITO
Ready to assemble and grill your cheesy masterpiece? Follow these detailed steps to achieve a perfectly toasted, flavor-packed burrito every time.
1. Lay the flour tortilla flat on a clean surface. Smooth out any folds so the fillings will distribute evenly and prevent tearing when rolling.
2. In the center of the tortilla, layer the seasoned ground beef or shredded chicken evenly. Spread it in a thin, uniform layer to maintain balance in every bite.
3. Add the cooked rice, pico de gallo or salsa, and any optional fillings you desire. Distribute them gently to create a colorful bed of textural contrasts.
4. Drizzle the nacho cheese sauce over the layers and add a dollop of sour cream. Ensure the sauces are nestled centrally so they melt into the fillings without leaking out.
5. Sprinkle the shredded cheddar and mozzarella cheeses over the top. Aim for an even blanket of cheese that will ooze and bind the ingredients during melting.
6. Fold the sides of the tortilla inwards, then roll it up tightly into a burrito. Tuck in the bottom edge first to create a secure, sealed pocket.
7. Preheat a skillet over medium heat and add butter or spray with cooking spray. Wait until the butter foams slightly or the spray forms a light shimmer.
8. Place the burrito seam-side down in the skillet. Cook for 2–3 minutes or until the tortilla is golden brown and the cheese starts to melt.
9. Carefully flip the burrito and grill the other side for another 2–3 minutes, pressing gently with a spatula to achieve an even crust.
10. Remove from heat and let it cool slightly before slicing in half for serving. This rest time helps the cheese settle, so it won’t gush out.
11. Serve with extra sour cream, guacamole, or salsa on the side if desired. Arrange your garnishes artfully for a picture-perfect plate.
SERVING SUGGESTIONS FOR GRILLED CHEESE BURRITO
When it comes to serving the Grilled Cheese Burrito, presentation and complementary flavors can elevate each bite. Whether you’re sharing this at a casual family dinner or a lively game-day gathering, these serving ideas will ensure your dish looks as good as it tastes. Think about color, texture, and contrast to create a memorable spread that tantalizes the eyes and palate alike. A well-arranged plate with vibrant garnishes and thoughtfully paired sides can turn a simple meal into an experience.
- Serve on a rustic wooden board with extra sour cream and salsa in small bowls, so guests can personalize each bite. The board’s warm tones highlight the golden-brown tortilla.
- Pair with a fresh Mexican street corn salad featuring charred corn, cotija cheese, cilantro, and lime. The salad’s brightness and crunch complement the burrito’s creamy interior.
- Create a dip trio: guacamole, pico de gallo, and chipotle aioli, arranged in a ceramic platter. Encourage dipping and sharing to make the meal interactive.
- Accompany with a side of tortilla chips and a cold beverage—think iced horchata or a frosty margarita—to balance heat and creaminess while adding a playful crunch.
HOW TO STORE GRILLED CHEESE BURRITO
Storing your Grilled Cheese Burrito properly ensures you can enjoy its cheesy goodness days later without sacrificing flavor or texture. Whether you’ve made extras for meal prep or simply want to save leftovers, these methods will keep your burrito tasting fresh. Achieving the perfect reheat also plays a vital role; you want the tortilla to regain its crispness and the cheese to remelt evenly. Let’s dive into the best tips and tricks for storing and reheating.
- Wrap cooled burritos in aluminum foil before placing them in the refrigerator. This method locks in moisture and prevents the tortilla from drying out overnight.
- Store individual servings in airtight containers, layered with parchment paper. This prevents sogginess and makes it easy to reheat just what you need.
- For longer preservation, wrap each burrito in foil and place it in a freezer-safe bag. Label with the date and freeze for up to one month. Thaw in the fridge before reheating.
- Reheat in a toaster oven or skillet over medium heat. Keep the foil on if using an oven, and remove it for a skillet to achieve that fresh, crispy exterior while ensuring the cheese inside melts thoroughly.
CONCLUSION
This Grilled Cheese Burrito has everything you crave: melty cheese, savory meat, fluffy rice, zesty pico de gallo, and creamy sauces, all toasted to golden perfection in just a few minutes. It’s the ultimate fusion of grilled cheese comfort and classic burrito heartiness, perfect for lunch, dinner, or anytime you need a delicious pick-me-up. From its beginner-friendly steps to the effortless ingredient list, this recipe proves that you don’t need complicated techniques or exotic components to create a standout meal. With a prep time of only 15 minutes and about six minutes on the skillet, you can whip up a satisfying dish that pleases both the eyes and the taste buds. Don’t forget the optional extras—jalapeños, black beans, chopped onions, or guacamole—to personalize the flavor profile exactly how you like it.
Feel free to print this article and save it for later so you have your go-to comfort food recipe at your fingertips. You can also find a FAQ below to address any questions about substitutions, dietary adjustments, or troubleshooting steps you might need. If you decide to give this Grilled Cheese Burrito a try, I’d love to hear how it turns out for you! Please share your comments, ask any questions, or drop feedback if you need help with any part of the process. Happy cooking and may your burrito be ever cheesy and perfectly crisp!
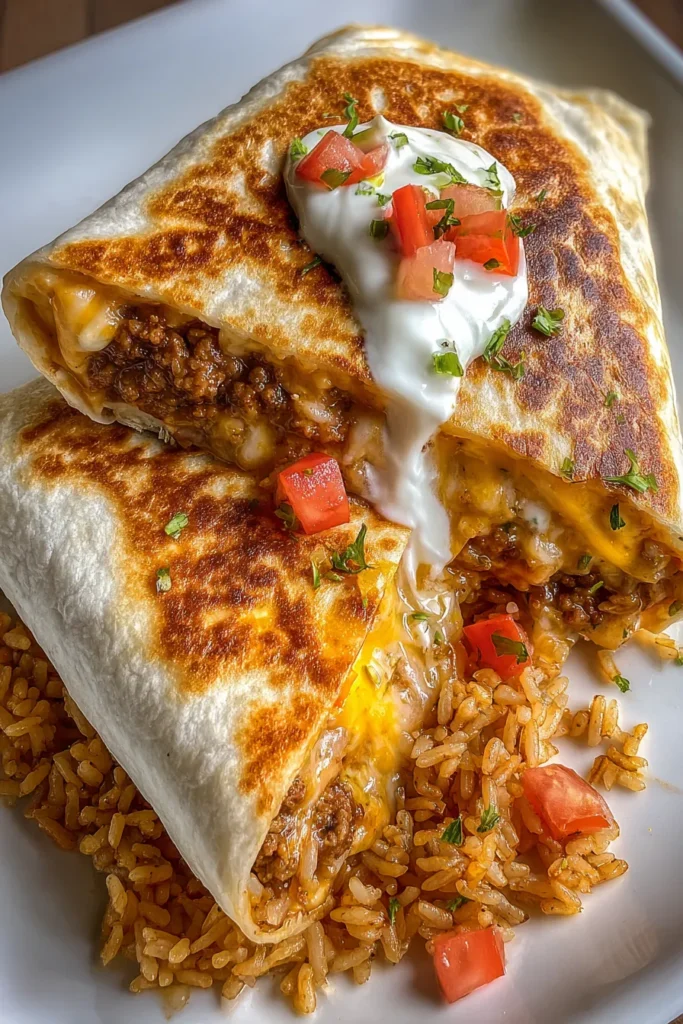

Grilled Cheese Burrito
Description
Experience layers of melty cheese, savory meat, and zesty toppings all enveloped in a toasty tortilla. It's a delightful fusion that hits every flavor note!
Ingredients
Instructions
-
Lay the flour tortilla flat on a clean surface.
-
In the center of the tortilla, layer the seasoned ground beef or shredded chicken evenly.
-
Add the cooked rice, pico de gallo or salsa, and any optional fillings you desire.
-
Drizzle the nacho cheese sauce over the layers and add a dollop of sour cream.
-
Sprinkle the shredded cheddar and mozzarella cheeses over the top.
-
Fold the sides of the tortilla inwards, then roll it up tightly into a burrito.
-
Preheat a skillet over medium heat and add butter or spray with cooking spray.
-
Place the burrito seam-side down in the skillet. Cook for 2-3 minutes or until the tortilla is golden brown and the cheese starts to melt.
-
Carefully flip the burrito and grill the other side for another 2-3 minutes.
-
Remove from heat and let it cool slightly before slicing in half for serving.
-
Serve with extra sour cream, guacamole, or salsa on the side if desired.
Note
- Use different cheese blends like pepper jack or Colby for a more dynamic flavor.
- Toast the inside of the tortilla for an extra crunch.
- Substitute the ground beef with beans for a vegetarian option.
- Make it spicy by adding hot sauce or jalapenos.
- Use leftover grilled chicken or steak for a delightful burrito twist.

