

Crafting a Mini Cheesecake Board is like hosting a party for your taste buds—one where creamy tang dances with sweet crunch and the vibrant colors of fresh fruit invite you in. Create a stunning Mini Cheesecake Board that’s perfect for gatherings, celebrations, or a delightful afternoon treat! Each bite bursts with the luscious flavor of smooth cheesecake nestled against crisp graham cracker crust, while an array of fresh berries, chocolate shavings, and caramel sauce offers endless possibilities for customization. Whether you’re celebrating a special occasion or simply craving a sweet pick-me-up, this dessert board ensures every guest finds their perfect little square. It’s a showstopper centerpiece, turning a simple board into a festive tapestry of textures and hues.
The beauty of this Mini Cheesecake Board is in its versatility and approachable difficulty level—rated intermediate—so home bakers can challenge themselves without feeling overwhelmed. With a total preparation time of just 20 minutes, an hour of baking, and a restful five-hour chill in the refrigerator, you’ll have twelve servings of dreamy dessert squares, each about 240 calories. This is the kind of recipe you’ll reach for again and again: the base cheesecake recipe is rock-solid, and the topping options—strawberries, raspberries, blueberries, kiwi slices, crushed nuts, mini chocolate chips—are limited only by your imagination. Make it ahead, keep toppings separate until the last moment, and let seasonal fruits shine. If you love discovering new ways to layer flavors and textures, you’re in for a delightful treat!
KEY INGREDIENTS IN MINI CHEESECAKE BOARD
Every incredible dessert starts with thoughtful ingredients that play an essential role in texture and flavor. Below are the stars you’ll need to assemble your Mini Cheesecake Board masterpiece:
- Graham Cracker Crumbs
Provides a buttery, slightly sweet base with a satisfyingly crunchy texture that contrasts perfectly with the creamy filling.
- Unsalted Butter
Binds the crumbs together for a sturdy crust; melting it brings richness without oversalting, allowing the cheesecake flavors to shine.
- Granulated Sugar
Adds just enough sweetness to the crust, enhancing the graham crumbs without overpowering the delicate cheesecake.
- Cream Cheese
The heart of every cheesecake; when softened and beaten until smooth, it creates that signature creamy, tangy filling base.
- Powdered Sugar
Ensures a silky texture in the filling without any grittiness, balancing the slight tartness of the cream cheese.
- Vanilla Extract
Deepens the overall flavor profile with warm, aromatic notes that complement both fruit and chocolate toppings.
- Eggs
Provide structure and lift; adding them one at a time helps achieve a smooth, custard-like consistency.
- Sour Cream
Contributes extra creaminess and a subtle tang, keeping the cheesecake moist and luscious.
- Fresh Lemon Juice
Brightens the filling with a refreshing zest, cutting through sweetness for a balanced bite.
- Toppings & Assorted Fruits
Fresh berries, chocolate shavings, caramel sauce, crushed nuts, mini chocolate chips, and sliced kiwi create vibrant color and layers of flavor.
- Edible Flowers (optional)
Elevate the board with a delicate, eye-catching garnish for that extra touch of elegance.
HOW TO MAKE MINI CHEESECAKE BOARD
Get ready to blend, bake, and assemble these irresistible mini cheesecakes into a showstopping board. Follow each detailed step below to ensure perfect texture and flavor:
1. Preheat the oven to 325°F (160°C) to guarantee even baking from start to finish.
2. In a medium bowl, combine the graham cracker crumbs, melted butter, and granulated sugar until the mixture resembles wet sand—this ensures a cohesive crust.
3. Press the crust mixture firmly into the bottom of a 9-inch springform pan, using the back of a measuring cup or your fingers to pack it tightly for a solid base. Bake for 10 minutes, then remove and allow it to cool completely.
4. In a large mixing bowl, beat the softened cream cheese with an electric mixer until smooth and creamy, scraping down the sides to avoid lumps.
5. Gradually add the powdered sugar and vanilla extract, mixing on low speed until the filling is well combined and silky.
6. Add the eggs, one at a time, mixing on low speed just until each is incorporated—be careful not to overmix, or you risk incorporating too much air.
7. Fold in the sour cream and fresh lemon juice until the batter is velvety and uniform.
8. Pour the cheesecake batter over the cooled crust, smoothing the top with a spatula.
9. Bake for 50–60 minutes, or until the edges are set and the center still has a slight jiggle.
10. Turn off the oven and leave the cheesecake inside to cool gradually for about an hour—this gentle process helps prevent cracks.
11. Remove the pan and let it reach room temperature, then refrigerate for at least 4 hours or overnight to set fully.
12. Once chilled, release the springform pan and transfer the cheesecake onto a serving board.
13. Cut into bite-sized squares or mini rounds using a sharp knife for clean edges.
14. Arrange the cheesecake pieces on a large platter or board, then decorate with fresh fruits, sauces, and crushed nuts. Garnish with edible flowers for an exquisite finishing touch.
SERVING SUGGESTIONS FOR MINI CHEESECAKE BOARD
When it comes to serving your Mini Cheesecake Board, presentation is everything. Think of your board as a blank canvas where colors, textures, and shapes come together to create a feast for the eyes and palate. Whether you’re hosting a casual get-together or an elegant soirée, these decorating tips will help you showcase your mini cheesecakes in style while guiding guests through a seamless tasting experience.
- Color-Blocked Layout
Arrange squares or rounds in groups by topping—fresh raspberry next to blueberries, chocolate shavings beside caramel drizzle—to create vibrant contrast and make selecting flavors intuitive.
- Height Variation
Use small risers or inverted bowls under the board to elevate certain sections, giving your display playful depth and preventing a flat presentation.
- Garnish with Herb Sprigs
Tuck sprigs of mint or rosemary around the board; their aromatic freshness pairs beautifully with creamy cheesecake and bright fruits, enticing guests to try each bite.
- Interactive Topping Station
Place mini bowls of crushed nuts, mini chocolate chips, and caramel sauce at one end, encouraging guests to customize their cheesecake squares for a fun, hands-on experience.
HOW TO STORE MINI CHEESECAKE BOARD
Ensuring your Mini Cheesecake Board stays fresh and delicious begins with proper storage. Whether you have leftovers or want to prep components in advance, these storage tips will keep your cheesecakes creamy and toppings vibrant for up to several days. Understanding the best conditions for different elements—crust, filling, and garnishes—will help you maintain texture and flavor without sogginess or spoilage.
- Store Plain Cheesecake in an airtight container in the refrigerator for up to five days; remove any garnishes to prevent moisture buildup on the crust.
- Keep Toppings separate in small, sealed containers at room temperature (for dry items like chocolate chips or nuts) or in the fridge (for fresh fruits and sauces), adding them just before serving.
- Freeze individual cheesecake squares by wrapping each piece in plastic wrap and placing them in a freezer-safe bag; they’ll keep for up to one month—thaw overnight in the fridge.
- For optimal flavor, let refrigerated slices sit at room temperature for 10–15 minutes before serving, allowing the flavors to bloom and the texture to soften slightly.
CONCLUSION
Bringing together a Mini Cheesecake Board is more than satisfying—it’s a celebration in every bite. We’ve walked through the key ingredients, from buttery graham cracker crumbs to tangy sour cream, and detailed each step of the baking process so your filling turns out irresistibly smooth. You’ve learned how to assemble, decorate, and serve a dessert board that’s as visually stunning as it is delectable. With options for customizable toppings, seasonal fruit accents, and optional edible flowers, this recipe offers endless creativity for every occasion, from weekend brunches to holiday feasts.
Feel free to print and save this article for later use, so the next time you need a standout dessert, the directions and tips are right at your fingertips. Below, you’ll find a helpful FAQ section to address any questions that pop up, ensuring you gain confidence with every bake. If you try this recipe or need guidance along the way, please share your comments, questions, or feedback. Your experiences and stories make the Mini Cheesecake Board even more special—so don’t hesitate to let us know how yours turned out!
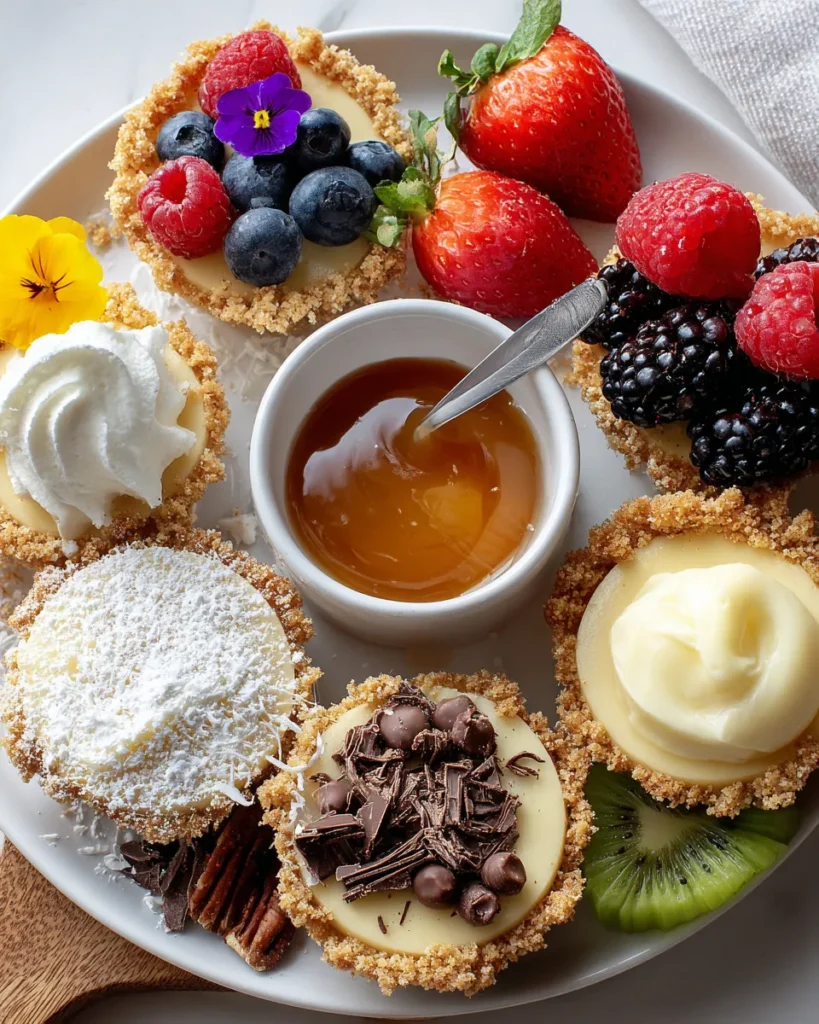

Mini Cheesecake Board
Description
This Mini Cheesecake Board bursts with flavors of creamy cheesecake nestled among fresh fruits and delectable toppings, making every bite a festive delight for any occasion.
Ingredients
Instructions
-
Preheat the oven to 325°F (160°C).
-
In a medium bowl, combine the graham cracker crumbs, melted butter, and granulated sugar until well mixed. The mixture should resemble wet sand.
-
Press the graham cracker mixture evenly into the bottom of a 9-inch springform pan to form the crust. Use the back of a measuring cup or your fingers to pack it tightly. Bake for 10 minutes, then remove from the oven and let it cool.
-
In a large mixing bowl, beat the softened cream cheese until smooth and creamy using an electric mixer.
-
Gradually add the powdered sugar and vanilla extract to the cream cheese, mixing until well combined.
-
Add the eggs, one at a time, mixing on low speed just until combined after each addition. Be careful not to overmix.
-
Mix in the sour cream and lemon juice until smooth and creamy.
-
Pour the cheesecake batter over the cooled crust in the springform pan.
-
Bake in the preheated oven for 50-60 minutes, or until the edges are set and the center is slightly jiggly.
-
Turn off the oven and leave the cheesecake inside to cool gradually for about 1 hour.
-
Remove from the oven, let it cool completely at room temperature, and then refrigerate for at least 4 hours or overnight.
-
Once chilled, carefully remove the cheesecake from the springform pan and place it on a serving board.
-
Cut the cheesecake into bite-sized squares or mini cheesecakes using a sharp knife.
-
Arrange the cheesecake squares on a large platter or board and creatively add the assorted toppings and fruits around them.
-
Garnish with edible flowers if desired, for an exquisite touch before serving.
Note
- You can customize the cheesecake flavors with different extracts such as almond or coconut for variation.
- Consider making a variety of cheesecake flavors by dividing the batter and mixing in melted chocolate, fruit purees, or spices.
- This board can be made ahead of time, just keep the toppings separate and add them right before serving for a fresh look.
- Mini cheesecakes are also a perfect way to use seasonal fruits in your presentation!

