

There’s something incredibly satisfying about sinking your teeth into a golden, crispy bun that yields a tender, savory filling with each bite. These pan-fried cabbage and noodle buns are the kind of snack—or even a light meal—that feels like a warm hug after a long day. The outside crisps up in a golden embrace, while the interior reveals finely shredded green cabbage, tender noodles, and vibrant carrots all tossed in a silky blend of soy sauce and sesame oil. Every mouthful is an adventure: a little crunch, a little chew, and a burst of garlicky, gingery goodness. It’s hard not to smile when you watch that flaky bottom develop in the hot skillet, and the steam swirls up as you lift the lid, promising a tender top that’s just waiting to be devoured.
Creating these little bundles of joy is surprisingly approachable, even if you haven’t made dough from scratch before. Between the soft, elastic dough that you knead and rest, and the simple but flavorful veggie-noodle filling, this recipe brings together textures and aromas that will have your kitchen smelling like a cozy dim sum spot. They’re vegetarian, yet feel indulgent enough to share as an appetizer at your next gathering or serve alongside a steaming bowl of broth as part of a comforting Asian-inspired meal. Plus, at around 450 calories per serving, they make a wonderful midweek treat without tipping the scales too far. From the first satisfying crunch to the lingering notes of ginger and green onion, these buns are an easy appetizer or snack that will undoubtedly become a well-loved staple in your recipe rotation.
KEY INGREDIENTS IN PAN-FRIED CABBAGE AND NOODLE BUNS
Every recipe shines when each ingredient plays its part, and these pan-fried cabbage and noodle buns are no exception. From the dough that puffs and crisps in the skillet to the aromatic filling that rewards your taste buds, here’s a closer look at the essentials you’ll need:
- All-Purpose Flour
Provides the structure and elasticity for the bun dough, giving it that perfect chew and allowing it to hold up to pan-frying without tearing.
- Hot Water
Helps to partially cook the flour’s starches, making the dough easier to knead and yielding a finer, more tender texture in the final bun.
- Cold Water
Balances the dough temperature so that it remains manageable and doesn’t become too sticky or too firm during kneading and resting.
- Salt
Enhances the flavor of both dough and filling, ensuring every bite is perfectly seasoned.
- Green Cabbage
Adds a light crunch and fresh vegetable sweetness, creating contrast in texture and flavor in each bite.
- Boiled Noodles
Introduce a chewy, comforting element to the filling, making the buns more substantial and deliciously satisfying.
- Carrots
Provide a burst of natural sweetness and vibrant color, cutting through the savory notes of garlic and soy sauce.
- Soy Sauce
Infuses the filling with umami richness and a gentle salty depth that ties all the ingredients together.
- Sesame Oil
Offers a warm, nutty aroma that elevates the filling, rounding out the flavors with its fragrant oiliness.
- Garlic
Brings a sharp, aromatic punch that pairs beautifully with the sweetness of the vegetables.
- Ginger
Lends a bright, zesty kick that keeps the filling tasting fresh and lively.
- Green Onions
Contribute a mild onion flavor and a pop of green color, adding freshness to each bite.
- Black Pepper
Provides a subtle heat and peppery warmth, balancing the overall flavor profile.
- Vegetable Oil
Is used for pan-frying, creating that irresistible crisp bottom while keeping the buns golden and evenly cooked.
HOW TO MAKE PAN-FRIED CABBAGE AND NOODLE BUNS
Let’s walk through the process of turning simple pantry staples into these irresistibly delicious buns. From dough preparation to the final pan-fry-and-steam technique, each step brings out wonderful textures and flavors.
1. In a large mixing bowl, combine the all-purpose flour and salt. Gradually add the hot water while continuously stirring with chopsticks or a fork until the mixture forms small clumps. This initial hydration kick-starts the dough development and makes kneading much easier.
2. Add the cold water gradually, mixing until a soft dough comes together. Transfer the dough to a lightly floured surface and knead for 8–10 minutes, until it’s smooth and elastic. Cover the dough and let it rest for 30 minutes, allowing the gluten to relax and making it much simpler to roll out.
3. In a separate bowl, mix together the shredded cabbage, chopped noodles, grated carrots, soy sauce, sesame oil, minced garlic, ginger, and green onions. Season with black pepper, tossing until everything is evenly coated. This vibrant filling is where all the flavors come together.
4. Divide the rested dough into equal parts, rolling each piece into a small ball. Using a rolling pin, flatten each ball into a disc about 4 inches in diameter. Aim for even thickness so the buns cook uniformly.
5. Place a spoonful of filling in the center of each disc. Gather the edges of the dough in a neat pleat pattern, sealing the filling inside, and pinch the top firmly to close the bun. This technique helps keep the filling snug within the dough.
6. Heat the vegetable oil in a large skillet over medium heat. Carefully place the buns seam side down into the skillet, ensuring they don’t touch each other. Cook until the bottoms turn golden brown, about 8–10 minutes, adjusting the heat if needed to prevent burning.
7. Carefully pour 1/4 cup of water around the buns and immediately cover the skillet with a lid. Allow the buns to steam for 8–10 minutes, or until the water has fully evaporated and the bottoms are crispy but no longer soggy.
8. Remove the buns from the skillet and serve them hot, with additional soy sauce for dipping if you like. Enjoy the contrast of the crunchy bottom, tender dough, and flavorful veggies in every bite.
SERVING SUGGESTIONS FOR PAN-FRIED CABBAGE AND NOODLE BUNS
These buns are versatile enough to stand alone as a delightful snack or shine as part of a larger feast. Whether you’re hosting an intimate gathering or enjoying a cozy meal at home, the way you present them can elevate the entire experience:
- Dim Sum Platter Arrangement
Arrange the buns on a large bamboo steamer or platter alongside small dipping bowls of soy sauce, chili oil, and black vinegar. The variety of dipping sauces lets guests personalize each bite.
- Crispy Bottom Showcase
Plate each bun seam-side up so the golden, crispy bottom is on display. Serve on a slate board or wooden board for a rustic touch that highlights the texture contrast.
- Asian-Inspired Salad Side
Toss together a quick cucumber and radish salad dressed with rice vinegar, a pinch of sugar, and a splash of sesame oil. The refreshing crunch of the salad pairs perfectly with the warm, savory buns.
- Tea Pairing
Brew a pot of green tea or jasmine tea to sip alongside the buns. The floral and vegetal notes of the tea cleanse your palate, balancing the richness of the pan-fried dough.
HOW TO STORE PAN-FRIED CABBAGE AND NOODLE BUNS
Keeping these buns at peak freshness is all about proper storage and reheating techniques. Whether you’re preparing them ahead of time for a party or saving leftovers for tomorrow’s lunch, these tips will help maintain their taste and texture:
- Refrigeration for Short-Term Enjoyment
Allow the buns to cool completely before placing them in an airtight container. Store in the refrigerator for up to 3 days. When ready to eat, reheat in a skillet over low heat with a splash of water and a lid to revive the steam and crisp the bottoms again.
- Freezing for Longer Storage
Flash-freeze the buns on a parchment-lined tray until solid, then transfer to a zip-top freezer bag, squeezing out excess air. They can be frozen for up to one month. Reheat from frozen by pan-frying and steaming just like the original recipe, adding a little extra water and time.
- Room Temperature Holding (Brief)
If you plan to serve within a couple of hours, keep the buns in a warm oven set to 200°F, covered loosely with foil to prevent drying out while preserving the crisp base.
- Reheating in the Oven
Preheat your oven to 350°F. Place the buns on a baking sheet and lightly mist the tops with water. Bake for 8–10 minutes, then broil for a final 1–2 minutes to restore the golden finish and crunch.
CONCLUSION
What a delightful adventure it has been exploring the world of pan-fried cabbage and noodle buns together! From kneading that smooth, elastic dough to filling each little parcel with a savory mix of veggies and noodles, you’ve learned how accessible and fun this intermediate-level recipe can be. These buns work brilliantly as a cozy appetizer, a surprising snack, or the star of an Asian-inspired dinner, sure to impress friends and family alike. With a total preparation time of 30 minutes, cooking time of 20 minutes, and a restful dough rise of 30 minutes, you’ll find this recipe fits seamlessly into busy weekdays or leisurely weekends.
Don’t forget to print or bookmark this article so you can save it for later and revisit every tip and trick along the way. You’ll also find a handy FAQ below to address any lingering questions about substitutions, dough techniques, or freezing tips. I’d love to hear how your buns turned out: drop a comment, share your triumphs (or any challenges!), and let me know if you need any extra guidance. Your feedback helps me refine recipes and ensure that home cooks everywhere enjoy the crisp, aromatic delight of these pan-fried cabbage and noodle buns again and again. Happy cooking, and I can’t wait to see your kitchen magic in action!
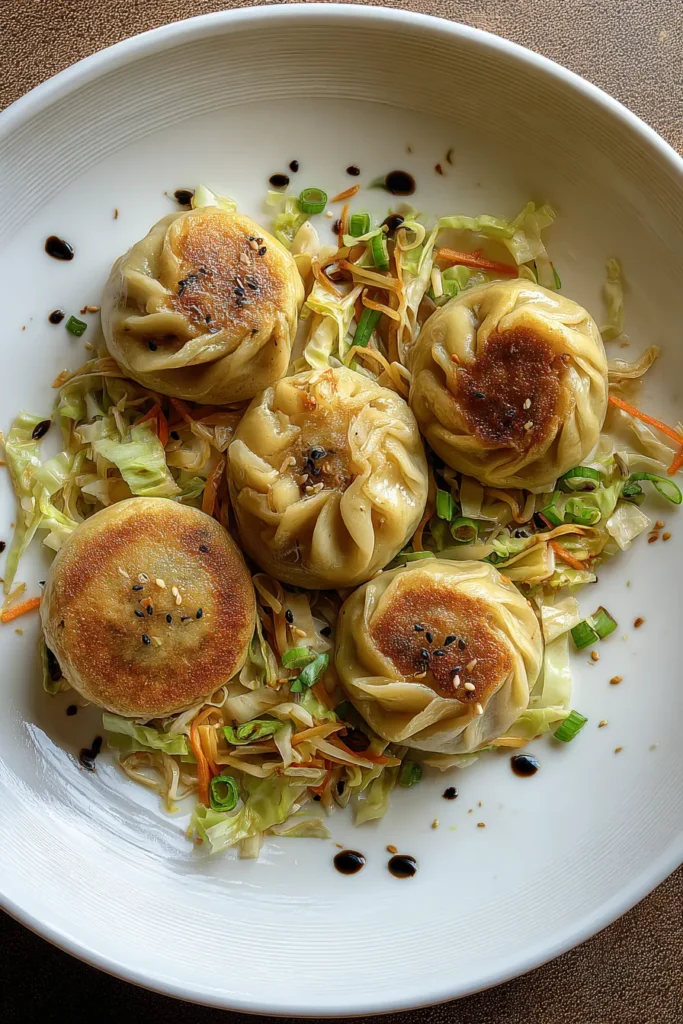

Pan-Fried Cabbage and Noodle Buns
Description
These golden buns burst with savory cabbage and noodles, perfectly balanced with aromatic garlic and sesame oil, making every bite a scrumptious adventure.
Ingredients
Instructions
-
In a large mixing bowl, combine the all-purpose flour and salt. Gradually add hot water while continuously stirring with chopsticks or a fork until the mixture forms small clumps.
-
Add the cold water gradually, mixing until a soft dough forms. Knead the dough on a floured surface for 8-10 minutes until smooth and elastic. Cover and let it rest for 30 minutes.
-
In a separate bowl, mix together shredded cabbage, chopped noodles, grated carrots, soy sauce, sesame oil, minced garlic, ginger, and green onions. Season with black pepper. Set the filling aside.
-
Divide the rested dough into equal parts and roll each piece into a small ball. Flatten each ball with a rolling pin to make a small disc (about 4 inches in diameter).
-
Place a spoonful of filling in the center of each disc. Gather the edges of the dough in a pleat pattern to seal the filling inside, pinching the top to close the bun.
-
Heat 3 tablespoons vegetable oil in a large skillet over medium heat. Carefully place the buns in the skillet, seam side down, and cook until the bottoms are golden brown, about 8-10 minutes.
-
Carefully add 1/4 cup of water around the buns and cover the skillet with a lid. Allow the buns to steam for an additional 8-10 minutes, or until the water evaporates and the buns have a crispy bottom.
-
Remove the buns from the skillet and serve hot with additional soy sauce for dipping, if desired.
Note
- These buns can be made ahead of time and frozen for quick appetizers or snacks.
- Try experimenting with adding different vegetables like mushrooms or bell peppers for variety.
- Perfect for a dim sum party or as part of an Asian-inspired meal.

