

Stained Glass Cookies are like little edible jewels—each buttery sugar cookie reveals a translucent candy center that shimmers in the light. With a tender edge and a glossy burst of color, these treats feel both nostalgic and magical. Whether you’re decking the dessert table for the holidays or surprising friends at a bake sale, these vibrant sugar cookies with jewel-like candy centers will turn heads and taste buds alike. Give them a try and watch everyone marvel at your crafty, colorful creations!
Key Ingredients
To create these stunning stained glass cookies, you’ll need a handful of pantry staples and crushed hard candies for that signature sparkle:
- 2 1/2 cups all-purpose flour: Provides the sturdy structure for perfectly shaped cookies.
- 1 teaspoon baking powder: Gives a gentle lift so cookies aren’t too dense.
- 1/2 teaspoon salt: Balances sweetness and enhances all the flavors.
- 1 cup unsalted butter, softened: Adds rich, creamy flavor and tender texture.
- 1 cup granulated sugar: Sweetens the dough and helps achieve crisp edges.
- 1 large egg: Binds ingredients and gives the dough stability.
- 1 teaspoon vanilla extract: Infuses warm, aromatic notes.
- 1 cup assorted hard candies, unwrapped and crushed: Creates the jewel-toned, translucent “stained glass” centers.
How To Make Stained Glass Cookies
Let’s walk through the process of transforming basic sugar cookie dough into a stunning stained glass masterpiece. You’ll mix, chill, cut, and bake with simple techniques, then let the candy centers set fully on the baking sheet for that flawless, glossy finish.
1. Preheat your oven to 350°F (175°C) and line a baking sheet with parchment paper to prevent sticking.
2. In a medium bowl, whisk together flour, baking powder, and salt; set this dry mix aside.
3. In a large bowl or stand mixer, beat butter and sugar on medium speed until light and fluffy, about 2 minutes.
4. Add the egg and vanilla extract, mixing until fully combined and smooth.
5. Gradually incorporate the flour mixture on low speed until a uniform dough forms.
6. Divide the dough in half, flatten each half into a disk, wrap in plastic wrap, and chill in the refrigerator for 30 minutes.
7. On a lightly floured surface, roll out one disk of dough to about 1/4-inch thickness for even baking.
8. Use cookie cutters to cut shapes, then employ a smaller cutter to remove centers from half of the shapes.
9. Arrange shapes on the prepared sheet, fill each cutout with a small pile of crushed hard candy, then gently top with the solid shapes.
10. Bake for 8–10 minutes until edges turn lightly golden; allow cookies to cool completely on the sheet so the candy centers set without cracking.
Serving Suggestions
Once your stained glass cookies are ready, here are a few creative ways to share the sparkle:
- Dust with powdered sugar for a delicate, frosted effect that highlights the candy centers.
- Display on a festive platter lined with evergreen sprigs or colorful napkins for a holiday-ready presentation.
- Pair with hot cocoa or mulled cider to contrast the crispy, sweet cookies with a warm, soothing drink.
- Package as edible gifts in clear cellophane bags tied with ribbons—guaranteed to delight neighbors and coworkers.
Tips For Perfect Stained Glass Cookies
Nailing the perfect stained glass cookie is easier than you think! A few friendly pointers will help you achieve that flawless window effect every time:
- Crush candies finely but leave some small pieces so colors shine through.
- Ensure cookies are completely cooled on the baking sheet to prevent the stained glass centers from cracking.
- Use different colored hard candies for a festive look and swap in holiday shapes as desired.
- Store cookies in a single layer to avoid cracking the glass-like centers.
How To Store It
Keeping these cookies crisp and beautiful is key—here’s how to maintain their freshness and shine:
- Airtight container at room temperature: Store cooled cookies in a single layer to preserve crisp edges and glossy centers.
- Layer with parchment paper: If stacking, place parchment sheets between layers to prevent candy centers from sticking or cracking.
- Avoid refrigeration: Humidity can soften the cookies and dull the candy finish, so stick to a cool, dry spot.
- Enjoy within one week: For best texture and vibrant color, consume or gift your cookies within seven days.
Frequently Asked Questions
Got questions about these shimmering treats? I’ve got you covered!
- Q: How long does it take to prepare and bake these stained glass cookies?
From start to finish, plan for about 30 minutes of active prep time, 30 minutes of chilling, 8–10 minutes of baking per batch, and another 10–15 minutes of cooling on the baking sheet. Total time is roughly 80–85 minutes, including cooling so the candy centers fully set.
- Q: Can I prepare the dough in advance or freeze it for later use?
Yes. After mixing, divide the dough into disks, wrap each tightly in plastic wrap, and refrigerate for up to two days or freeze for up to one month. Thaw frozen disks in the refrigerator overnight before rolling and cutting. Bring chilled dough to a slightly softened state on the counter for about 10 minutes before rolling.
- Q: What variety of hard candies work best for the stained glass effect, and how should I crush them?
Clear or brightly colored hard candies like Jolly Ranchers, Life Savers, or unflavored clear mints produce the best translucent finish. Place unwrapped candies in a sealed plastic bag and gently tap with a rolling pin until you have a mix of fine crystals and small chunks. Sift out any large shards to ensure smooth, even melting and avoid overly sharp fragments.
- Q: How can I prevent the candy centers from cracking when the cookies cool?
After baking, leave the cookies to cool completely on the same baking sheet. Cooling on a cool counter can lead to sudden temperature changes that crack the candy. Maintain a consistent room temperature, avoid moving or stacking the cookies until the centers have fully solidified (about 10–15 minutes), and resist lifting them too soon.
- Q: Can I customize shapes and colors for different occasions?
Absolutely. Swap out your basic round cutter for festive shapes—stars, hearts, or holiday-themed cutters work beautifully. Match candy colors to the occasion: red and green for Christmas, pastels for Easter, or team colors for game day. You can even layer two candy colors for a marbled stained glass look.
- Q: What is the best way to store these cookies to maintain crisp edges and glossy centers?
Store fully cooled cookies in a single layer in an airtight container at room temperature. If you must stack, place parchment or wax paper between layers to protect the candy centers. Stored this way, they’ll stay fresh for up to one week; excessive humidity or refrigeration can soften cookies and dull the glass-like centers.
What Makes This Special
These Stained Glass Cookies turn classic sugar cookies into dazzling, jewel-like treats—vibrant candy centers shimmer like tiny windows set in a buttery frame. The contrast of crisp edges and glossy bursts of color makes every bite a delightful surprise, perfect for any festive table. Print this recipe, stash it in your binder, and try it the next time you need a show-stopping dessert. I’d love to hear your thoughts, tweaks, or color-combination experiments in the comments below!
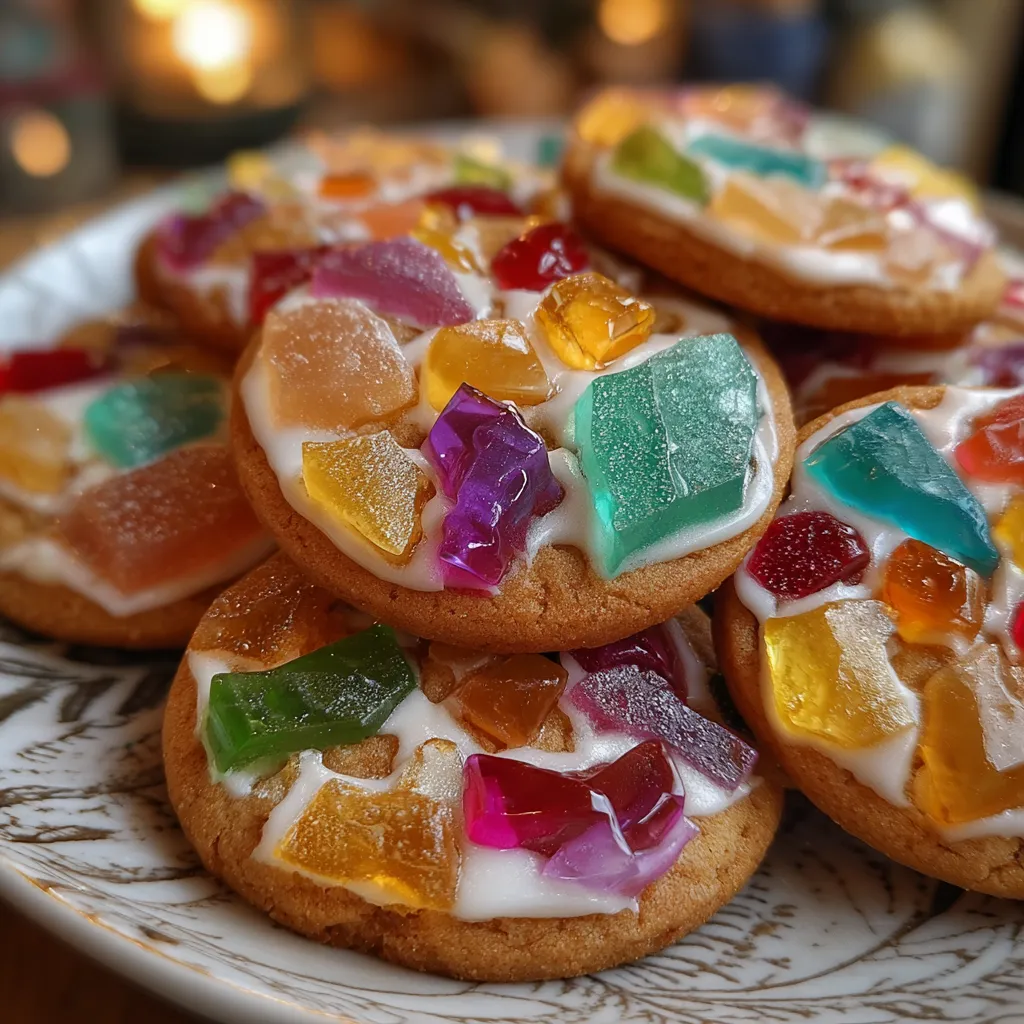

Stained Glass Cookies
Description
These buttery sugar cookies reveal translucent candy centers that shimmer like stained glass. Each crisp bite combines delicate cookie edges with glossy, jewel-toned bursts of sweet, crunchy candy.
Ingredients
Instructions
-
Preheat oven to 350°F (175°C) and line a baking sheet with parchment paper.
-
In a medium bowl whisk together flour, baking powder, and salt; set aside.
-
In a large bowl or stand mixer beat butter and sugar until light and fluffy, about 2 minutes.
-
Add egg and vanilla extract and mix until combined.
-
Gradually add flour mixture, mixing on low speed until dough forms.
-
Divide dough in half, flatten into disks, wrap in plastic, and chill for 30 minutes.
-
Roll out one disk of dough on a lightly floured surface to about 1/4-inch thickness.
-
Use cookie cutters to cut out shapes, then use a smaller cutter to remove centers from half the shapes.
-
Place shapes on prepared sheet, fill each cutout center with a small pile of crushed hard candy, and top with the solid shapes.
-
Bake 8–10 minutes until edges are lightly golden; allow cookies to cool completely on the sheet so the candy centers set.
Note
- Crush candies finely but leave some small pieces so colors shine through.
- Ensure cookies are completely cooled on the baking sheet to prevent the stained glass centers from cracking.
- Use different colored hard candies for a festive look and swap in holiday shapes as desired.
- Store cookies in a single layer to avoid cracking the glass-like centers.

