

Strawberry Earthquake Cake is the ultimate beginner-friendly dessert that combines tender yellow cake, creamy cheesecake ribbons, juicy strawberry bursts, and playful white chocolate chips, all crowned with a fluffy whipped topping. Fresh strawberries peek through the cheesecake swirls and yellow cake layers, topped with white chocolate chips for a decadent twist. This show-stopping treat is surprisingly easy to pull off—perfect for any gathering or a special treat at home.
Key Ingredients
Before we dive in, let’s gather our essentials for this delightful Strawberry Earthquake Cake.
- 1 box yellow cake mix: Provides a light, fluffy foundation with minimal effort.
- 1 package instant vanilla pudding mix: Adds extra moisture and a subtle vanilla creaminess.
- 1 cup sour cream: Keeps the cake tender and adds a gentle tang.
- 4 large eggs: Give structure and help bind all the ingredients together.
- 1/2 cup vegetable oil: Enhances moistness and extends shelf life.
- 1/2 cup water: Hydrates the cake mix for perfect batter consistency.
- 1 cup sugar: Sweetens and stabilizes the cheesecake layer.
- 8 ounces cream cheese: Creates those signature creamy cheesecake swirls.
- 1 teaspoon vanilla extract: Boosts overall flavor with warm vanilla notes.
- 1 cup white chocolate chips: Melt into pockets of sweet, buttery goodness.
- 2 cups sliced fresh strawberries: Offer juicy bursts of freshness in every bite.
- 1 cup whipped topping: Crowns the cake with a light, airy finish.
How To Make Strawberry Earthquake Cake
Let’s bring those layers to life! You’ll start with a classic yellow cake batter, add dreamy cheesecake dollops, and finish with vivid strawberries and white chocolate chips. Once it’s baked to golden perfection, a chill and a whipped topping finish create the perfect texture contrast—soft cake meets cool cream in each slice. Follow these detailed steps to achieve your own earthquake of flavor.
1. Preheat oven to 350°F and grease a 9×13 inch baking pan thoroughly, ensuring every corner is coated to prevent sticking.
2. In a large mixing bowl, combine the yellow cake mix, vanilla pudding mix, sour cream, eggs, vegetable oil, and water; beat on medium speed until completely smooth and free of lumps.
3. Spread half of the batter evenly into the prepared pan, using an offset spatula to create a uniform layer for perfect baking.
4. In another bowl, beat cream cheese, sugar, and vanilla extract until creamy and smooth; drop spoonfuls over the batter and swirl lightly with a knife to form marbled cheesecake streaks.
5. Gently spread the remaining batter over the cream cheese layer, then scatter white chocolate chips and sliced strawberries evenly on top for that signature quake effect.
6. Bake for 35 to 40 minutes, or until a toothpick inserted in the center comes out clean or with just a few moist crumbs.
7. Allow the cake to cool completely in the pan so the layers set properly before topping.
8. Spread whipped topping over the cooled cake and refrigerate for at least one hour before serving to achieve a firm, cool finish.
Serving Suggestions
When it’s time to serve, presentation and pairings can elevate this Strawberry Earthquake Cake to the next level. Whether you’re entertaining guests or indulging in a cozy night in, these ideas will make each slice unforgettable.
- Fresh Berry Garnish: Top each slice with extra sliced strawberries and a mint sprig for a pop of color.
- Strawberry Sauce Drizzle: Warm a little strawberry compote and lightly drizzle over the cake for added sweetness.
- Creamy Ice Cream Pairing: Serve alongside a scoop of vanilla bean ice cream to complement the cheesecake ribbons.
- White Chocolate Shavings: Sprinkle white chocolate shavings on top for extra decadence and texture.
Tips For Perfect Strawberry Earthquake Cake
Nailing this recipe is all about the details. With a few simple tweaks, you’ll get clean slices, well-defined layers, and maximum flavor every time. Let’s make sure your first quake is a huge success!
- Use room temperature ingredients for even mixing.
- Fresh strawberries add the best flavor but thawed frozen berries can work in a pinch.
- Allowing the cake to chill helps the layers set and makes slicing cleaner.
- For a richer variation substitute sour cream with full-fat Greek yogurt.
How To Store It
Proper storage keeps your Strawberry Earthquake Cake moist and delicious for days. Whether you’re saving leftovers or prepping ahead, these methods will maintain freshness and flavor.
- Refrigerate Covered: Once frosted, cover the pan tightly with plastic wrap or a lid and refrigerate.
- Individual Wraps: Slice and wrap each piece in plastic wrap for quick grab-and-go treats.
- Freeze Slices: Place slices on a baking sheet, freeze until firm, then transfer to a freezer bag for up to one month.
- Avoid Stacking: Store in a single layer to prevent the whipped topping from squishing.
Frequently Asked Questions
Got questions? Let’s clear them up!
- How do I know when the Strawberry Earthquake Cake is fully baked?
The cake is done when the edges are lightly golden, and a toothpick inserted into the center emerges clean or with just a few moist crumbs. Because of the cream cheese layer, the center may look slightly fudgy, but it should not have wet batter. Aim for 35 to 40 minutes at 350°F and check at the 35-minute mark.
- Can I use frozen strawberries instead of fresh ones?
Yes. Thaw frozen strawberries completely, drain off any excess liquid, and pat them dry before slicing. Excess moisture can make the cake soggy, so ensure the berries are as dry as possible before topping the batter.
- What’s the best way to swirl the cream cheese layer without overmixing?
After dropping spoonfuls of the cream cheese mixture over the first batter layer, use a butter knife or small offset spatula. Gently drag the knife through the batter in S-shaped motions, just a few passes. Over-swirling will blend the layers too much, so stop as soon as you see marbled patterns.
- How long can I store leftovers, and how should I store them?
Once frosted with whipped topping, cover the pan tightly with plastic wrap or a lid and refrigerate. It will keep well for up to 3 days. For best texture, avoid stacking anything on top and serve chilled.
- Can I make this cake ahead of time for an event?
Absolutely. You can bake and cool the cake a day in advance, then frost and refrigerate. The flavors deepen overnight, and chilling helps the layers set. Just add the whipped topping within a few hours of serving to keep it light and fluffy.
- Is it okay to substitute full-fat Greek yogurt for sour cream?
Yes. Use an equal amount of full-fat Greek yogurt in place of the sour cream. The tanginess and thickness are similar, and it can make the cake slightly richer while maintaining moisture.
- How can I prevent the white chocolate chips from sinking to the bottom?
Toss the white chocolate chips in a tablespoon of all-purpose flour before sprinkling; this light coating helps suspend them in the batter. Also, gently press them into the top layer of batter right before baking to reduce sinking.
- My cake layers sometimes blend together—how do I keep them distinct?
Make sure the first batter layer is evenly spread and the cream cheese layer is chilled slightly if very soft. Work quickly but gently, and avoid over-mixing the top batter. Baking immediately after assembling ensures the layers don’t diffuse before setting in the oven.
What Makes This Special
This Strawberry Earthquake Cake brings together the best of every dessert world—moist yellow cake, creamy cheesecake swirls, juicy strawberry bursts, and melty white chocolate chips—then crowns it all with a cloud of whipped topping. It’s fun, festive, and downright addictive! Grab your apron, make a mess (the quake effect is worth it), and print this recipe to save for later. If you give it a whirl, drop a comment below with your results or any questions—you’ll be the star of your next dessert table!
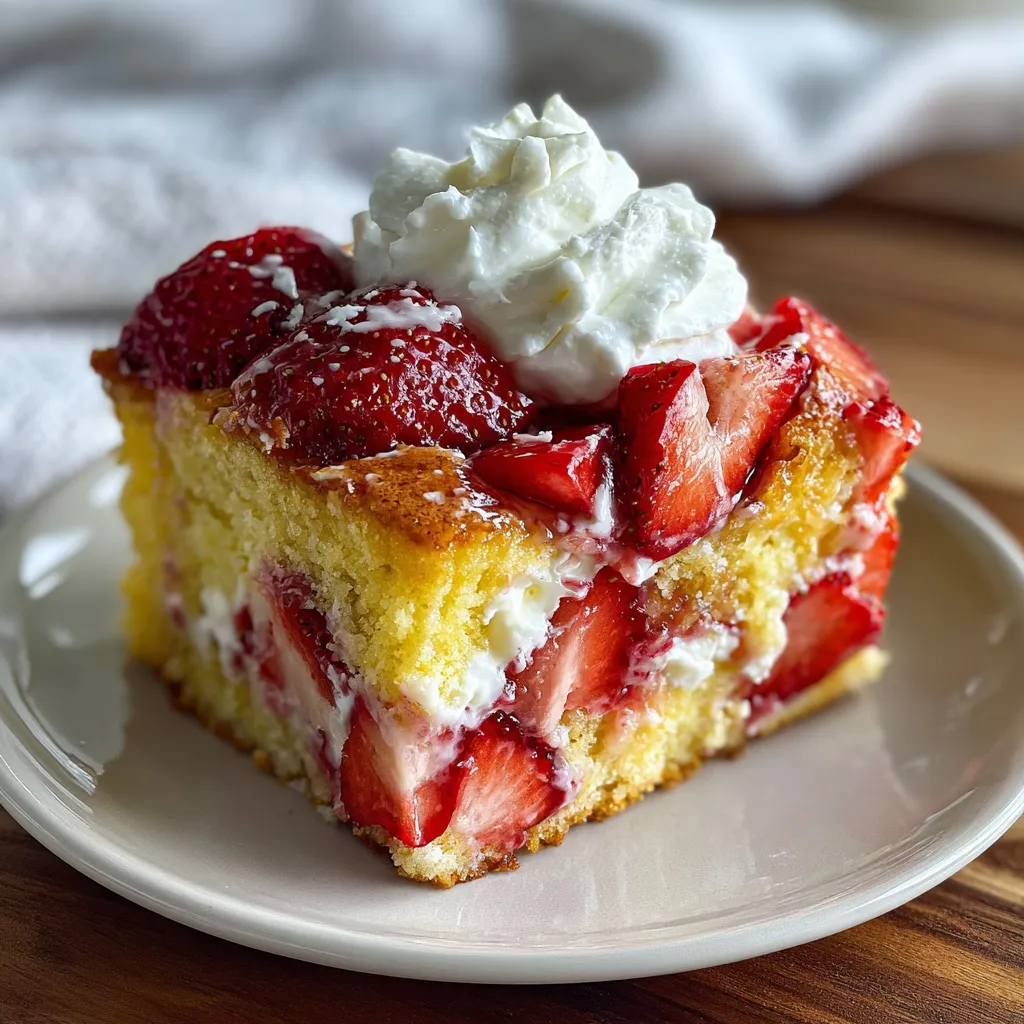

Strawberry Earthquake Cake
Description
Creamy cheesecake morsels ripple through tender yellow cake, studded with juicy strawberries and white chocolate chips, then crowned with fluffy whipped topping for a cool finish.
Ingredients
Instructions
-
Preheat oven to 350°F and grease a 9x13 inch baking pan.
-
In a mixing bowl combine yellow cake mix, vanilla pudding mix, sour cream, eggs, vegetable oil, and water; beat until smooth.
-
Spread half of the batter evenly into the prepared pan.
-
In another bowl beat cream cheese, sugar, and vanilla extract until creamy; drop spoonfuls over the batter and swirl lightly with a knife.
-
Spread remaining batter over the cream cheese layer; top with white chocolate chips and sliced strawberries.
-
Bake for 35 to 40 minutes or until a toothpick inserted in the center comes out clean.
-
Allow the cake to cool completely in the pan.
-
Spread whipped topping over the cooled cake and refrigerate for at least one hour before serving.
Note
- Use room temperature ingredients for even mixing.
- Fresh strawberries add the best flavor but thawed frozen berries can work in a pinch.
- Allowing the cake to chill helps the layers set and makes slicing cleaner.
- For a richer variation substitute sour cream with full-fat Greek yogurt.

