

Thanksgiving gatherings are all about warmth, laughter, and creating sweet memories with loved ones. These Thanksgiving Cake Pops bring a playful twist to classic holiday desserts—tiny bites of vanilla cake blended with creamy buttercream, dipped in cheerful orange candy coating, and decorated with festive sprinkles and glitter. When you bring out a platter of these vibrant cake pops, you’ll see faces light up as guests admire each perfectly round pop perched on its stick. It’s almost like handing out little edible ornaments that capture the spirit of the season. With every bite, you get the tender crumb of vanilla cake, the luscious richness of buttercream, and that satisfying snap of candy coating before succumbing to the soft center.
Whether you’re a seasoned baker or a curious beginner, this recipe fits right into your holiday prep. It’s labeled “Beginner” for a reason—no complicated techniques, just straightforward steps that yield 24 pops in about 90 minutes total (30 minutes prep, 30 minutes bake, 30 minutes chill). Each pop clocks in at roughly 120 calories, making them easy to enjoy without overindulging. These treats also double as party favors or hostess gifts—imagine handing one to each guest on their way out, tied with a bit of rustic twine and a tiny thank-you tag. So roll up your sleeves, line up your candy melts, and get ready to fill your home with smiles, sparkles, and a touch of Thanksgiving magic.
KEY INGREDIENTS IN THANKSGIVING CAKE POPS
Before you dive into the fun of molding and dipping cake pops, gather the essentials that will make every bite shine.
- Vanilla cake mix
A reliable base that bakes up light and fluffy, providing the sweet foundation for every pop. The mix ensures consistent texture and flavor without the fuss of making cake from scratch.
- Buttercream frosting
Acts as both a flavor booster and binding agent, transforming cake crumbs into a malleable dough. Its creamy sweetness keeps each pop tender and moist.
- Orange candy melts
Delivers that vibrant, autumnal hue and creates a sturdy outer shell. These melts coat the cake pops smoothly, adding a burst of color that screams “holiday.”
- Brown candy melts
Used for drizzling rich chocolate patterns across the pops. This contrasting drizzle introduces a nutty cocoa note and visually enhances the festive look.
- White candy melts
Perfect for creating bright, eye-catching accents and delicate drizzle designs. They offer a sweet vanilla undertone that complements the orange coating.
- Chocolate sprinkles
Adds playful texture and a hint of crunch. Sprinkles turn each cake pop into a little party, making them irresistible to both kids and adults.
- Edible glitter
Optional but oh-so-festive—sprinkle it on for twinkling, sugar-coated magic that catches the light and dazzles your guests.
- Lollipop sticks
Essential for dipping, displaying, and munching. They make these treats easy to hold and delightful to eat.
- Optional decorations
Mini chocolate chips, candy corn, or small fondant shapes bring extra personality. Use them to craft tiny pumpkins, fall leaves, or any design that sets your table aglow.
HOW TO MAKE THANKSGIVING CAKE POPS
Ready to transform simple ingredients into festive cake pops? Follow these detailed steps for a seamless dipping and decorating experience.
1. Preheat your oven and bake the vanilla cake according to the package instructions. Be sure to grease your pan and level the batter so it bakes evenly. Once golden brown and springy to the touch, remove it and let it cool completely on a wire rack.
2. Transfer the cooled cake to a large mixing bowl and crumble it into fine pieces using clean hands or a fork. Aim for a texture that’s mostly uniform—this helps the frosting blend in smoothly.
3. Add the buttercream frosting gradually, starting with a few spoonfuls. Mix using your hands or a sturdy spatula, pressing and folding until the crumbs cling together and form a moldable dough. You want a consistency that holds its shape without being too sticky.
4. Scoop or roll the mixture into small balls, about 1 inch in diameter. Use a cookie scoop for uniformity or your palms for a more rustic look. Place each ball on a baking tray lined with parchment paper.
5. Gently insert a lollipop stick about halfway into each cake ball, twisting slightly so it’s secure but not pushed through. Refrigerate the tray for 30 minutes to let the centers firm up—this step prevents them from slipping off the stick during dipping.
6. While the cake pops chill, melt the orange candy melts in a microwave-safe bowl. Heat in 30-second bursts, stirring between intervals until the coating is completely smooth and lump-free. Avoid overheating to prevent scorching.
7. Holding a chilled cake pop by the stick, dip it into the melted orange candy, rotating to cover evenly. Lift it out and gently tap off excess coating against the bowl’s edge. Return it to the parchment-lined tray so the base can set.
8. Immediately decorate while the candy is still wet: roll the bottom half in chocolate sprinkles or edible glitter, or press on mini chocolate chips and candy corn for extra fun. The slightly tacky coating helps decorations stay put.
9. Melt the brown and white candy melts in separate bowls, following the same 30-second interval method. Transfer each to a piping bag (or a zip-top bag with a tiny corner snipped off), then drizzle contrasting lines and dots over the orange-coated pops for an artful finish.
10. Allow the decorated cake pops to set completely at room temperature, or speed up the process by chilling them briefly in the refrigerator until the coating hardens.
11. Arrange your finished cake pops upright on a decorative platter or in a foam stand. Stand back, admire your festive creations, and get ready to impress guests with these charming holiday treats!
SERVING SUGGESTIONS FOR THANKSGIVING CAKE POPS
Turning a batch of cake pops into a memorable display is half the fun. Whether you’re hosting a big family gathering or a cozy dinner with friends, thoughtful presentation elevates these sweet bites from simple to spectacular. Consider how you’ll showcase the pops—will they be the centerpiece of your dessert table, casual grab-and-go treats by the coffee station, or personalized party favors for each guest? Pair them with complementary colors, textures, and flavors to create a cohesive holiday spread. Don’t forget to think about height and layering: using stands, tiered trays, or rustic wooden boards keeps everything at eye level and encourages guests to help themselves. Here are some creative ideas to get you started:
- Autumn Leaf Platter
Arrange the pops on a large white platter lined with faux or edible fall leaves. The contrast of bright orange against deep reds, browns, and golds makes each pop stand out. Scatter a few mini pumpkins or cinnamon sticks around for an extra seasonal vibe.
- Individual Treat Bags
Place each cake pop in a clear cellophane bag, tie the top with rustic twine or a satin ribbon, and add a small gift tag with guests’ names. This approach doubles as place cards and party favors, ensuring everyone goes home with a sweet memory.
- Cozy Coffee Bar Companion
Set up a hot drink station with spiced apple cider, pumpkin spice lattes, or a simple hot chocolate bar. Display the cake pops upright in mason jars or decorative mugs so guests can grab a pop to dip or munch alongside their warm beverage.
- Tiered Dessert Tower
Use a three-tiered serving stand to create a vertical display. On the bottom tier, place cookies or mini pies; the middle tier features the cake pops; and the top tier holds small muffins or cupcakes. This layered approach keeps your table dynamic and frees up surface space.
HOW TO STORE THANKSGIVING CAKE POPS
Proper storage is key to maintaining the flavor, texture, and colorful look of your cake pops. Whether you’re prepping them a day in advance or saving leftovers, these tips will keep your treats tasting fresh. Always handle the pops gently to avoid cracks in the candy coating, and store them in a cool, stable environment away from direct sunlight or moisture. If you live in a warm climate or your home tends to run hot, refrigeration helps preserve the coating and prevents sticky spots. Here are a few tried-and-true methods for stashing your Thanksgiving Cake Pops:
- Store Upright in an Airtight Container
Use a shallow, rigid container and stand the pops upright using crumpled parchment or a cake pop stand. Secure the lid to keep out air and moisture, then refrigerate for up to one week. This method preserves both texture and decoration.
- Freeze Individually Wrapped Pops
For longer storage, wrap each pop tightly in plastic wrap, then place them in a freezer-safe bag or container. Freeze for up to one month. When you’re ready to serve, unwrap and thaw at room temperature for about 30 minutes—this prevents condensation from dripping onto the candy coating.
- Short-Term Room Temperature Storage
If you plan to serve within 1–2 days and your kitchen is cool (below 70°F), store the pops in a single layer in an airtight container at room temperature. Avoid humid areas and keep them away from heat sources like ovens or windows.
- Use Silica Gel Packs for Moisture Control
Slip a small food-grade silica gel packet into the container (ensure it doesn’t touch the pops). These packets absorb excess moisture and help keep your decorations crisp and crack-free for several days.
CONCLUSION
These Thanksgiving Cake Pops combine the ease of a boxed mix with the delight of homemade decorations to deliver a beginner-friendly dessert that sparkles on any holiday table. From the smooth, sweet vanilla cake crumb bound by rich buttercream, to the vibrant orange candy coating and contrasting chocolate and white drizzle, each pop is a miniature work of edible art. With a total time commitment of about 90 minutes, you’ll be free to focus on creating memories rather than wrestling with tricky techniques. Whether you’re prepping an entire tray for your family dinner or assembling individual treat bags for guests, these pops are sure to be a conversation starter—both for their vivid colors and for the love poured into every step, from crumbling the cake to dipping and decorating.
Feel free to print this article and tuck it into your holiday binder or recipe box so it’s handy whenever you need a festive dessert idea. Below you’ll find a handy FAQ section to troubleshoot common questions and share extra tips, ensuring your cake pops turn out perfectly each time. If you decide to try this recipe, I’d love to hear how it goes! Share your feedback, ask any questions, or let me know about your unique decorating twists. Your comments not only help me improve these guides but also inspire fellow home cooks to spread holiday cheer, one cake pop at a time. Happy baking, and may your Thanksgiving be as sweet as these little treats!
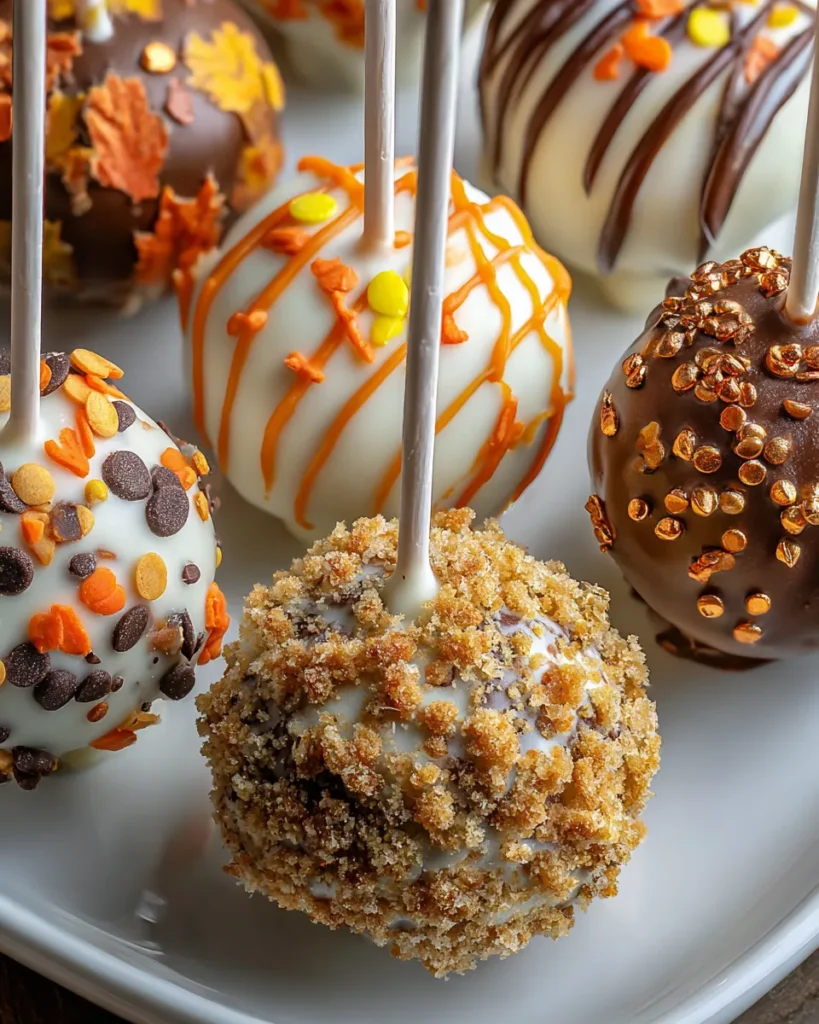

Thanksgiving Cake Pops
Description
These Thanksgiving Cake Pops are a delightful mix of vanilla cake and creamy buttercream, coated in vibrant orange candy melts and festive sprinkles, perfect for celebrations.
Ingredients
Instructions
-
Bake the vanilla cake according to the package instructions and allow it to cool completely.
-
Once the cake has cooled, crumble it into a large mixing bowl.
-
Add the buttercream frosting gradually to the crumbled cake, mixing with your hands or a spatula until the mixture holds together and is moldable.
-
Using your hands, roll the mixture into small balls (about 1 inch in diameter) and place them on a baking tray lined with parchment paper.
-
Insert a lollipop stick into each cake ball, being careful not to push it all the way through. Refrigerate the tray for about 30 minutes to let the cake pops firm up.
-
While the cake pops are chilling, melt the orange candy melts in a microwave-safe bowl in 30-second intervals, stirring in between, until fully melted and smooth.
-
Dip each chilled cake pop into the melted orange candy, tapping off any excess coating. Return the pops to the parchment-lined tray.
-
For decoration, while the candy is still wet, roll the bottom half of each pop in chocolate sprinkles or edible glitter, or add mini chocolate chips or candy corn on top.
-
Once all cake pops are decorated, melt the brown and white candy melts separately, and use them to drizzle designs over the orange-coated cake pops for an extra festive touch.
-
Allow the cake pops to set completely at room temperature, or you can refrigerate them briefly to harden the coating.
-
Serve on a decorative platter for a festive Thanksgiving treat.
Note
- These cake pops can also be customized by using different flavors of cake mix and frosting.
- For a fun twist, consider incorporating Thanksgiving-themed decorations like little fondant pumpkins or fall leaves.
- Cake pops can be stored in an airtight container in the refrigerator for up to a week.
- These treats make great party favors or gifts for guests during the holiday season.

